Search By Image
On this page
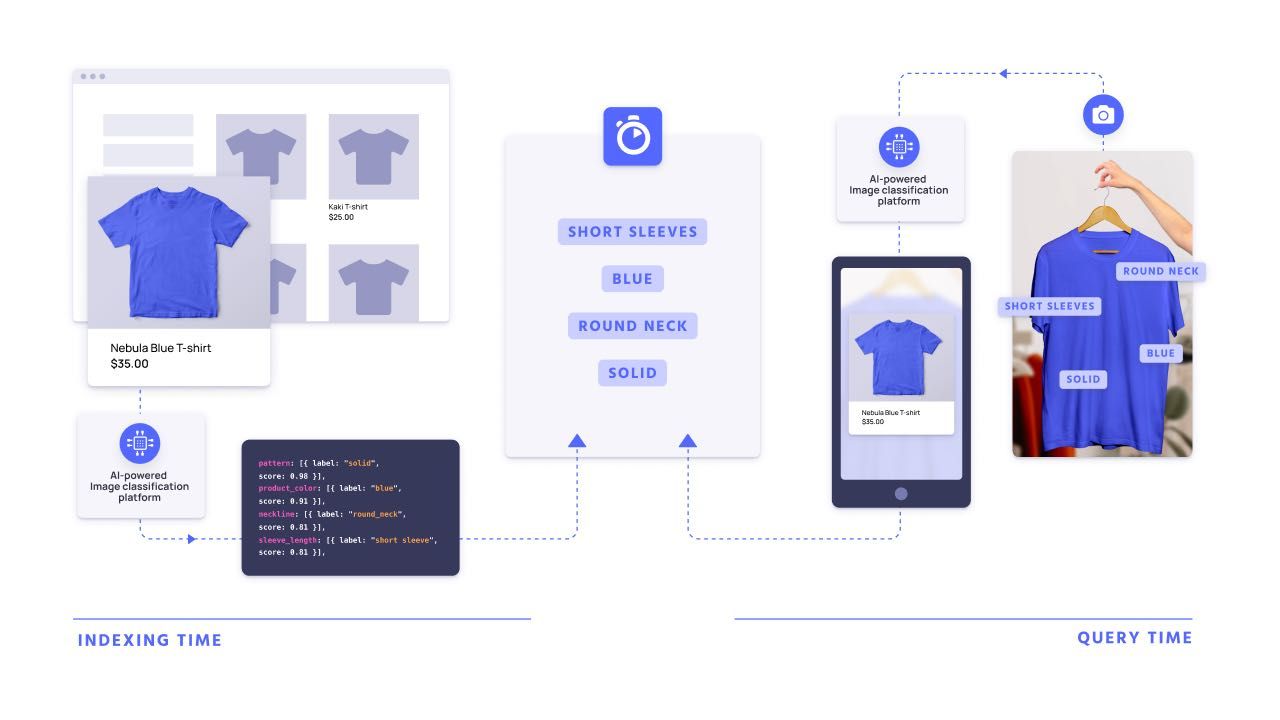
More and more often, users want to search for products using images, not just words. This querying technique is commonly referred to as reverse image search. It allows users to quickly find more information on a product and buy it.
This guide outlines how to use a third party API or platform to turn images into Algolia search queries. It uses the Google Cloud Vision API, but you could use other providers like Amazon Rekognition or ViSenze. Some platforms are made for particular use cases, such as ViSenze for retail. Google Cloud Vision API is an all purpose image recognition API.
Before implementing reverse image search, you must first enrich your records using the same image recognition platform you plan to use for reverse image search. Once you’ve tagged your records, when a user searches using an image, those same classifications can help retrieve the right record.
Solution requirements
| Difficulty |
|
| Prerequisites | Algolia records enriched using image classification, access to an image recognition platform such as Google Cloud Vision API |
This guide assumes you’ve already enriched your Algolia records using an image recognition platform. It outlines how to extract a set of classifications from an image and how to turn those classifications into an Algolia query. It doesn’t cover the UI part of this UX. Specifically, you’ll need to add the ability for users to upload an image to your search bar and display results accordingly.
Image classification
The Algolia engine searches for records using a textual query or set of query parameters. The first step in transforming an image file into a set of query parameters is to use an image recognition platform. Image recognition platforms such Google Cloud Vision API take an image and return a set of classifications—or “labels”—for it.
Once your users have uploaded an image to use for search, you need to run the image through the same image recognition platform you used to enrich your records. You can use the same function you used to classify images on your records:
1
2
3
4
5
6
7
8
9
10
11
12
13
14
15
16
17
18
19
20
21
22
23
24
25
26
27
28
29
30
31
32
33
34
35
36
37
38
39
40
41
42
43
44
45
46
47
// Import the Google Cloud client libraries
const vision = require('@google-cloud/vision');

// Instantiate Google Vision client
const client = new vision.ImageAnnotatorClient();

// Retrieve labels
const getImageLabels = async (imageURL, objectID, scoreLimit) => {
  const [result] = await client.labelDetection(imageURL);
  const labels = result.labelAnnotations
    .filter(label.score > scoreLimit)
    .map( label => (
      {
        description: labels.description,
        score:
      }
    ))
  return { imageURL, objectID, labels };
}

// const classifiedImage = await getImageLabels("https://images-na.ssl-images-amazon.com/images/I/41uIVaJOLdL.jpg", "439784001", 0.5)
{
  imageURL: "https://images-na.ssl-images-amazon.com/images/I/41uIVaJOLdL.jpg",
  objectID: "439784001",
  labels: [
    {
      "description": "Outerwear",
      "score": 0.9513528,
    },
    {
      "description": "Azure",
      "score": 0.89286935,
    },
    {
      "description": "Sleeve",
      "score": 0.8724504,
    },
    {
      "description": "Bag",
      "score": 0.86443543,
    },
    {
      "description": "Grey",
      "score": 0.8404184,
    }
  ]
}
Turning classifications into an Algolia query
Once you’ve extracted classifications from an image, the next step is to turn them into an Algolia query. For this, you can send an empty query with classifications as optionalFilters. Optional filters boost results with matching values.
To use classifications as optionalFilters, you must first declare the classification attributes in attributesForFaceting.
First you need to take each classification and format it properly:
1
2
3
4
5
6
7
8
function reduceLabelsToFilters(labels) {
    let optionalFilters = [];
    // Loop through the labels and add each one to the filters
    labels.forEach(label => {
        optionalFilters.push(`labels.description:'${labels.description}'`)
    });
    return optionalFilters;
}
In this example, image classifications are stored in the label.descriptions nested attribute in each product. You should update the text to be used in the optionalFilters according to your record format.
Then you can pass these as optionalFilters as a query time parameter. How you do so depends on your front-end implementation.
If you’re using InstantSearch, you can use the configure widget:
1
2
3
instantsearch.widgets.configure({
  optionalFilters: reduceLabelsToFilters(labels)
});
If you’re using an API client, you can pass it as a parameter in the search method:
1
2
3
4
5
index.search('query', {
  optionalFilters: reduceLabelsToFilters(labels)
}).then(({ hits }) => {
  console.log(hits);
});

