Use React InstantSearch with React Native
We released React InstantSearch Hooks, a new InstantSearch library for React. We recommend using React InstantSearch Hooks in new projects or upgrading from React InstantSearch.
Overview
React InstantSearch is compatible with React Native.
However, React InstantSearch widgets aren’t compatible with React Native. To leverage InstantSearch features in React Native, you must use connectors.
In this guide, you can learn how to build a basic InstantSearch app with React native. Build a more advanced React Native example linking React InstantSearch to React Native.
To build a React Native app with React InstantSearch, you should understand these concepts:
Getting Started with React Native InstantSearch
React Native InstantSearch is a React Native library that lets you create a mobile version of a search results experience using Algolia’s Search API.
To get started, you will build a search UI for an ecommerce website. You will learn how to:
- Bootstrap a React InstantSearch app with our command line utility
create-instantsearch-app - Display and format the search bar and results
- Use pre-built UI components (widgets) to filter results
Your goal is to create a fully working React Native InstantSearch app as fast as possible. We provide you with the data, installation instructions, and a step-by-step process with all necessary code. We will not explain how everything is wired together yet, but you’ll be able to dig into the library immediately after.
If you haven’t done so yet, take a look at our interactive getting started tutorial. It literally takes 2 minutes to complete.
⚡️ Let’s go!
Build a simple UI
Bootstrap your application
To easily bootstrap a working React Native InstantSearch app in seconds, you will use the create-instantsearch-app command line tool.
Open a terminal and paste these lines:
1
2
3
4
5
6
npx create-instantsearch-app ais-ecommerce-demo-app \
  --template "React InstantSearch Native" \
  --app-id latency \
  --api-key 6be0576ff61c053d5f9a3225e2a90f76 \
  --index-name instant_search \
  --attributes-to-display name
This generates a folder on your machine that looks like this:
1
2
3
4
5
6
7
8
9
10
11
12
ais-ecommerce-demo-app/
├── node_modules
├── src
├── .babelrc
├── .eslintrc.js
├── .gitignore
├── .prettierrc
├── App.js
├── app.json
├── package.json
├── README.md
└── yarn.lock
Your application uses some predefined credentials (application ID, API key and index name) that we provide as part of this getting started.
create-instantsearch-app can be used to generate any flavor of InstantSearch and has many options. Read more about it on the GitHub repository.
React Native InstantSearch can be installed via an npm package in your already existing React Native application, this is covered in details in the installation guide.
Run your project
Now that we have bootstrapped the project, let’s do a first run! Inside your terminal, type:
1
2
cd ais-ecommerce-demo-app
npm start
The terminal will let you choose which simulator you want to use (Android or iOS). In this example we pick the iOS one. Once the simulator is up and ready you should see this:
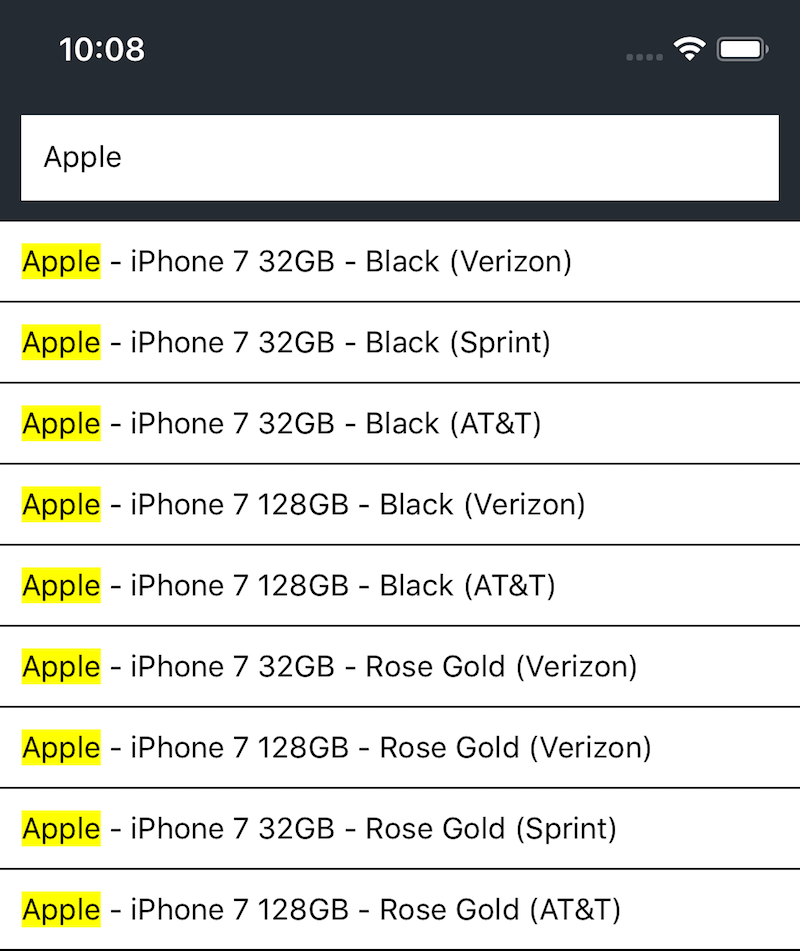
💅 You nailed it! You just bootstrapped an instant search UI in no time. Now, let’s dig into the code.
Dig in and understand the code
If you read the code of the file App.js you can see that you are using three components:
InstantSearchis the root React Native InstantSearch component, all other widgets need to be wrapped by this for them to functionSearchBoxdisplays a nice looking SearchBox for users to type queries in itInfiniteHitsdisplays the results in a infinite list from Algolia based on the query
Using Connectors instead of Widgets
The main difference between React InstantSearch and React Native InstantSearch is that we don’t provide any widgets for React native. But you’ll still be able to build an amazing search experience using what we call connectors.
For example, let’s take a closer look at the InfiniteHits component in src/InfiniteHits.js:
1
2
3
4
5
6
7
8
9
10
11
12
13
14
15
16
17
18
19
20
21
22
import React from 'react';
import { StyleSheet, Text, View, FlatList } from 'react-native';
import { connectInfiniteHits } from 'react-instantsearch-native';
import Highlight from './Highlight';

const InfiniteHits = ({ hits, hasMore, refineNext }) => (
  <FlatList
    data={hits}
    keyExtractor={item => item.objectID}
    ItemSeparatorComponent={() => <View style={styles.separator} />}
    onEndReached={() => hasMore && refineNext()}
    renderItem={({ item }) => (
      <View style={styles.item}>
        <Highlight attribute="name" hit={item} />
      </View>
    )}
  />
);

// [...]

export default connectInfiniteHits(InfiniteHits);
To display results, we use the connectInfiniteHits connector. This connector gives you all the results returned by Algolia, and it will update when there are new results. It will also keep track of all the accumulated hits while the user is scrolling.
This connector gives you three interesting properties:
hits: the records that match the search statehasMore: a boolean that indicates if there are more pages to loadrefineNext: the function to call when the end of the page is reached to load more results.
On the React Native side, we take advantage of the FlatList to render this infinite scroll. The FlatList component is available since version v0.43 of React Native. If you’re using a previous version, you can use the ListView component instead.
That’s it! All the widgets that we are going to use with React Native follow this same pattern. Don’t hesitate to take a look at the two other widgets already implemented.
Filtering
To make your search UI more efficient and practical for your users, you will want to add a way to filter the store by brands.
Create a new file src/RefinementList.js with:
1
2
3
4
5
6
7
8
9
10
11
12
13
14
15
16
17
18
19
20
21
22
23
24
25
26
27
28
29
30
31
32
33
34
35
36
37
38
39
40
41
42
43
44
45
46
47
48
49
50
import React from 'react';
import { StyleSheet, View, Text, TouchableOpacity } from 'react-native';
import PropTypes from 'prop-types';
import { connectRefinementList } from 'react-instantsearch-native';

const styles = StyleSheet.create({
  // fill with styles on the next step
});

const RefinementList = ({ items, refine }) => (
  <View style={styles.container}>
    <View style={styles.title}>
      <Text style={styles.titleText}>Brand</Text>
    </View>
    <View style={styles.list}>
      {items.map(item => {
        const labelStyle = {
          fontSize: 16,
          fontWeight: item.isRefined ? '800' : '400',
        };

        return (
          <TouchableOpacity
            key={item.value}
            onPress={() => refine(item.value)}
            style={styles.item}
          >
            <Text style={labelStyle}>{item.label}</Text>
            <View style={styles.itemCount}>
              <Text style={styles.itemCountText}>{item.count}</Text>
            </View>
          </TouchableOpacity>
        );
      })}
    </View>
  </View>
);

const ItemPropType = PropTypes.shape({
  value: PropTypes.arrayOf(PropTypes.string).isRequired,
  label: PropTypes.string.isRequired,
  isRefined: PropTypes.bool.isRequired,
});

RefinementList.propTypes = {
  items: PropTypes.arrayOf(ItemPropType).isRequired,
  refine: PropTypes.func.isRequired,
};

export default connectRefinementList(RefinementList);
To create this new widget we use the connector connectRefinementList. This widget allows us to filter our results by a given attribute.
This connector gives you two interesting properties:
items: the list of refinementsrefine: the function to call when a new category is selected
Then you can add this new widget to your App component:
1
2
3
4
5
6
7
8
9
10
11
12
import RefinementList from './src/RefinementList';

// [...]

<InstantSearch
  searchClient={searchClient}
  indexName="instant_search"
>
  <SearchBox />
  <RefinementList attribute="brand" limit={5} />
  <InfiniteHits />
</InstantSearch>
The attribute props specifies the faceted attribute to use in this widget. This attribute should be declared as a facet in the index configuration as well. Here we are using the brand attribute. Note that we are also using another prop limit. It’s not required, but it ensures that the list is not too long depending on which simulator you are.
You can polish the UI with these styles in src/RefinementList.js:
1
2
3
4
5
6
7
8
9
10
11
12
13
14
15
16
17
18
19
20
21
22
23
24
25
26
27
28
29
30
31
32
const styles = StyleSheet.create({
  container: {
    padding: 10,
    backgroundColor: '#FFFFFF',
  },
  title: {
    alignItems: 'center',
  },
  titleText: {
    fontSize: 20,
  },
  list: {
    marginTop: 20,
  },
  item: {
    paddingVertical: 10,
    flexDirection: 'row',
    justifyContent: 'space-between',
    borderBottomWidth: 1,
    alignItems: 'center',
  },
  itemCount: {
    backgroundColor: '#252b33',
    borderRadius: 25,
    paddingVertical: 5,
    paddingHorizontal: 7.5,
  },
  itemCountText: {
    color: '#FFFFFF',
    fontWeight: '800',
  },
});
Go to your simulator, it has reloaded and now you can see this:
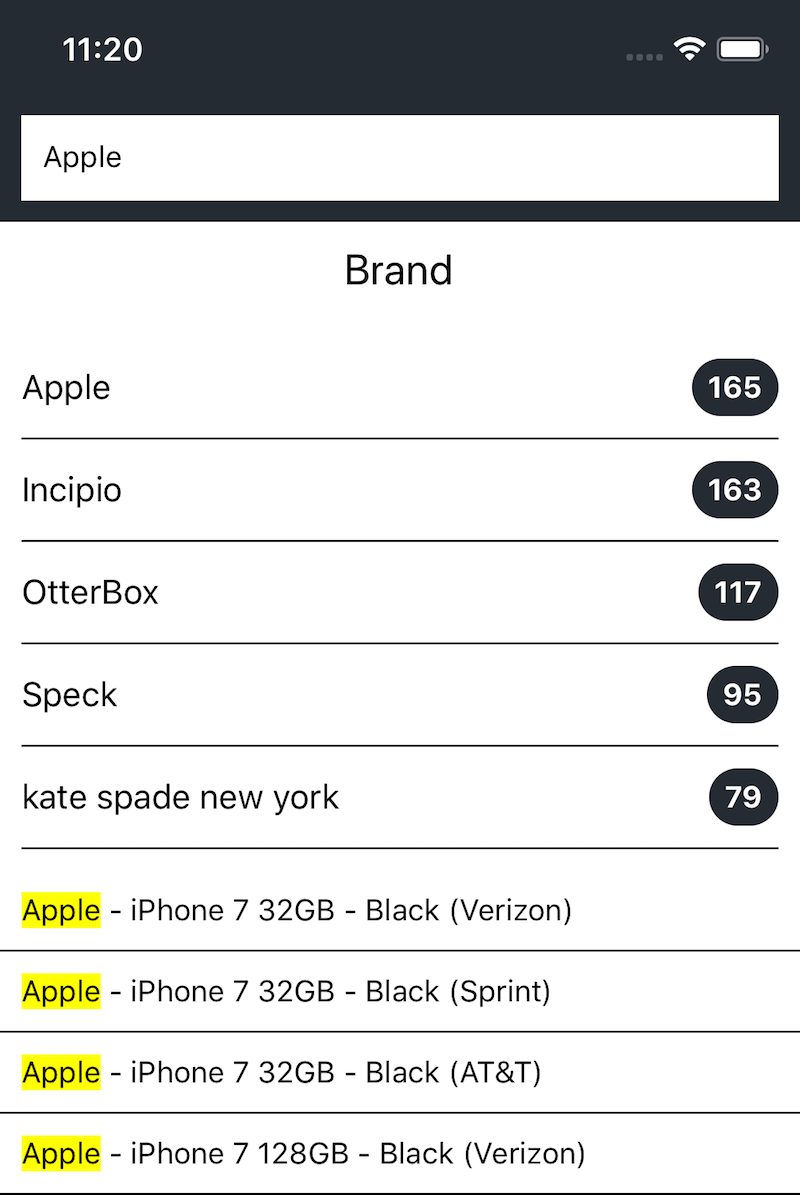
🍬 Sweet! You just added a new widget to your first instant-search page.
Create a modal
Space is limited on mobile screens. It’s better to extract this RefinementList and display it inside a Modal.
When using the Modal, child components are mounted and unmounted depending on whether the Modal is visible or not. React InstantSearch applies refinements only if its corresponding widget is mounted. If a widget is unmounted then its state is removed from the search state as well.
To keep track of the refinements applied inside the Modal (or another screen if you have navigation), you’ll need to use another InstantSearch component and synchronize the search state between them.
InstantSearch takes two interesting props:
onSearchStateChange: a function that is called every time the search state changes.searchState: the search state to apply.
We are going to leverage those two props to keep in sync our two InstantSearch components.
First, let’s create the Modal in a new file src/Filters.js:
1
2
3
4
5
6
7
8
9
10
11
12
13
14
15
16
17
18
19
20
21
22
23
24
25
26
27
28
29
30
31
32
33
34
35
36
37
38
39
40
41
42
43
44
45
46
47
48
49
50
51
52
53
54
55
import React from 'react';
import {
  StyleSheet,
  SafeAreaView,
  Modal,
  Text,
  TouchableOpacity,
} from 'react-native';
import PropTypes from 'prop-types';
import { InstantSearch } from 'react-instantsearch-native';
import RefinementList from './RefinementList';

const styles = StyleSheet.create({
  closeButton: {
    alignItems: 'center',
    marginTop: 20,
  },
  closeButtonText: {
    fontSize: 18,
  },
});

const Filters = ({
  isModalOpen,
  searchState,
  searchClient,
  toggleModal,
  onSearchStateChange,
}) => (
  <Modal animationType="slide" visible={isModalOpen}>
    <SafeAreaView>
      <InstantSearch
        searchClient={searchClient}
        indexName="instant_search"
        searchState={searchState}
        onSearchStateChange={onSearchStateChange}
      >
        <RefinementList attribute="brand" />
        <TouchableOpacity style={styles.closeButton} onPress={toggleModal}>
          <Text style={styles.closeButtonText}>Close</Text>
        </TouchableOpacity>
      </InstantSearch>
    </SafeAreaView>
  </Modal>
);

Filters.propTypes = {
  isModalOpen: PropTypes.bool.isRequired,
  searchState: PropTypes.object.isRequired,
  searchClient: PropTypes.object.isRequired,
  toggleModal: PropTypes.func.isRequired,
  onSearchStateChange: PropTypes.func.isRequired,
};

export default Filters;
Second, let’s add our Modal to our first App component:
1
2
3
4
5
6
7
8
9
10
11
12
13
14
15
16
17
18
19
20
21
22
23
24
25
26
27
28
29
30
31
32
33
34
35
36
37
import React, { useState } from 'react';
import { StyleSheet, View, SafeAreaView, StatusBar, Button } from 'react-native';
import Filters from './src/Filters';

// [...]

const App = () => {
  const [isModalOpen, setModalOpen] = useState(false);
  const [searchState, setSearchState] = useState({});

  const toggleModal = () => setModalOpen(!isModalOpen);

  return (
    <SafeAreaView style={styles.safe}>
      <StatusBar barStyle="light-content" />
      <View style={styles.container}>
        <InstantSearch
          searchClient={searchClient}
          indexName="instant_search"
          searchState={searchState}
          onSearchStateChange={setSearchState}
        >
          <Filters
            isModalOpen={isModalOpen}
            searchClient={searchClient}
            searchState={searchState}
            toggleModal={toggleModal}
            onSearchStateChange={setSearchState}
          />
          <SearchBox />
          <Button title="Filters" color="#252b33" onPress={toggleModal} />
          <InfiniteHits />
        </InstantSearch>
      </View>
    </SafeAreaView>
  );
};
Go to your simulator, it has reloaded and now you can see this:
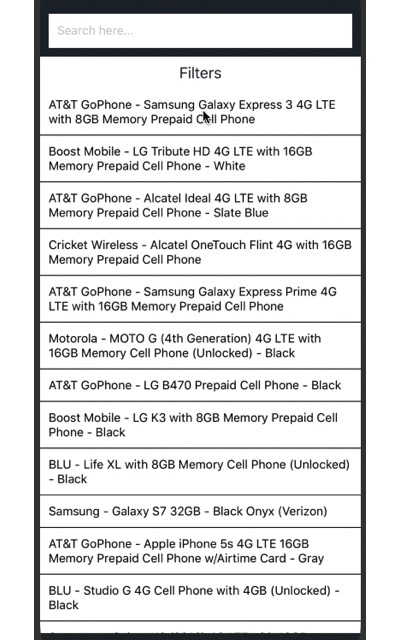
If you tried the application and selected a brand, you saw that when you closed the Modal, the refinement is not applied to the search. This is because for a refinement to be applied, it needs to be present inside the search state and have a corresponding widget mounted.
So indeed, we will need a RefinementList mounted on our first InstantSearch. Of course, we don’t want to render anything, we just want to apply the refinement.
Luckily we can leverage a concept that is called Virtual Widgets. Those widgets allow you to pre-refine any widget without rendering anything.
Let’s create one for our RefinementList in App.js:
1
2
3
4
5
import { InstantSearch, connectRefinementList } from 'react-instantsearch-native';

// [...]

const VirtualRefinementList = connectRefinementList(() => null);
Let’s add it to our App:
1
2
3
4
5
6
7
8
9
10
11
12
13
14
15
16
17
18
19
20
21
22
23
24
25
26

// [...]

<SafeAreaView style={styles.safe}>
  <StatusBar barStyle="light-content" />
  <View style={styles.container}>
    <InstantSearch
      searchClient={searchClient}
      indexName="instant_search"
      searchState={searchState}
      onSearchStateChange={setSearchState}
    >
      <VirtualRefinementList attribute="brand" />
      <Filters
        isModalOpen={isModalOpen}
        searchClient={searchClient}
        toggleModal={toggleModal}
        searchState={searchState}
        onSearchStateChange={setSearchState}
      />
      <SearchBox />
      <Button title="Filters" color="#252b33" onPress={toggleModal} />
      <InfiniteHits />
    </InstantSearch>
  </View>
</SafeAreaView>
Congrats, you can now filter your results by brands!
That’s it!
You just learned how to create your first React Native InstantSearch application. You can find the source code of this example on GitHub.
