Using Optional Filters
On this page
Optional filters
Filters don’t have to be exclusive. They don’t just remove records that don’t match the filter values. Sometimes, you may want to use filters in a way that favors or disfavors records that match with those that don’t match a filter.
For example, if someone searches for “hungry” and clicks the “deliver quickly” facet, you may interpret this as them looking for restaurants that can deliver as soon as possible. Yet, you wouldn’t necessarily want to filter out other restaurants, especially if most of them can’t deliver right away. You can achieve this with Algolia’s optionalFilters feature.
For all legacy plans (Community, Essential, Plus, signed-up before December 15, 2018), optional filters are limited to one per query.
Imagine you have the following dataset:
1
2
3
4
5
6
7
8
9
10
11
12
13
14
15
16
17
18
19
20
[
  {
    "name": "Pasta Bolognese",
    "restaurant": "Millbrook Deli",
    "delivery_waiting_time": 20,
    "popularity": 80
  },
  {
    "name": "Pasta Bolognese",
    "restaurant": "The Hive",
    "delivery_waiting_time": 15,
    "popularity": 80
  },
  {
    "name": "Pasta Bolognese",
    "restaurant": "Bert's Inn",
    "delivery_waiting_time": 40,
    "popularity": 90
  }
]
You set:
- Descending custom ranking on
popularity - Ascending custom ranking on
delivery_waiting_time
If a user searches for “pasta bolognese”, the first result would be “Bert’s Inn” because it has higher popularity. Then you would have “The Hive” and “Millbrook Deli” because they have the same popularity, so the engine would move on to delivery_waiting_time to tie break. The top result is the most popular one, not necessarily the one that can deliver as fast as possible.
To push the records that can deliver quickly first, regardless of the custom ranking, use optional filters. Since the optionalFilters parameter only applies on exact matches, and you can’t do numeric comparisons like with filters, you must alter your dataset.
For example, to define a quick waiting time of 20 minutes, create an attribute can_deliver_quickly and set it to true for each record with a delivery_waiting_time of “20” or less.
Add a quick delivery flag to your dataset
1
2
3
4
5
6
7
8
9
10
11
12
13
14
15
16
17
18
19
20
21
22
23
[
  {
    "name": "Pasta Bolognese",
    "restaurant": "Millbrook Deli",
    "delivery_waiting_time": 20,
    "can_deliver_quickly": true,
    "popularity": 80
  },
  {
    "name": "Pasta Bolognese",
    "restaurant": "The Hive",
    "delivery_waiting_time": 15,
    "can_deliver_quickly": true,
    "popularity": 80
  },
  {
    "name": "Pasta Bolognese",
    "restaurant": "Bert's Inn",
    "delivery_waiting_time": 40,
    "can_deliver_quickly": false,
    "popularity": 90
  }
]
When users click on the “deliver quickly” facet, you want to automatically boost every record in which can_deliver_quickly is equal to true. To do so, you first need to set can_deliver_quickly in your list of attributes for faceting. Then you would create an optional filter with can_deliver_quickly=true.
If a user leaves a bad review for Bert’s Inn, you may want to push the result to the bottom of the list. It’s still available to the user, but the results are less relevant. You can do this with a negative optional filter on the restaurant’s name.
Using the dashboard
Set the attribute to use for faceting in your Algolia dashboard:
- Select the Search product icon on your dashboard and then select your index. (that includes the ‘can delivery quickly’ flag).
- Click the Configuration tab.
- In the Facets subsection of Filtering and Faceting, click the “Add an attribute” button and select the
can_deliver_quicklyattribute from the dropdown. - Don’t forget to save your changes.
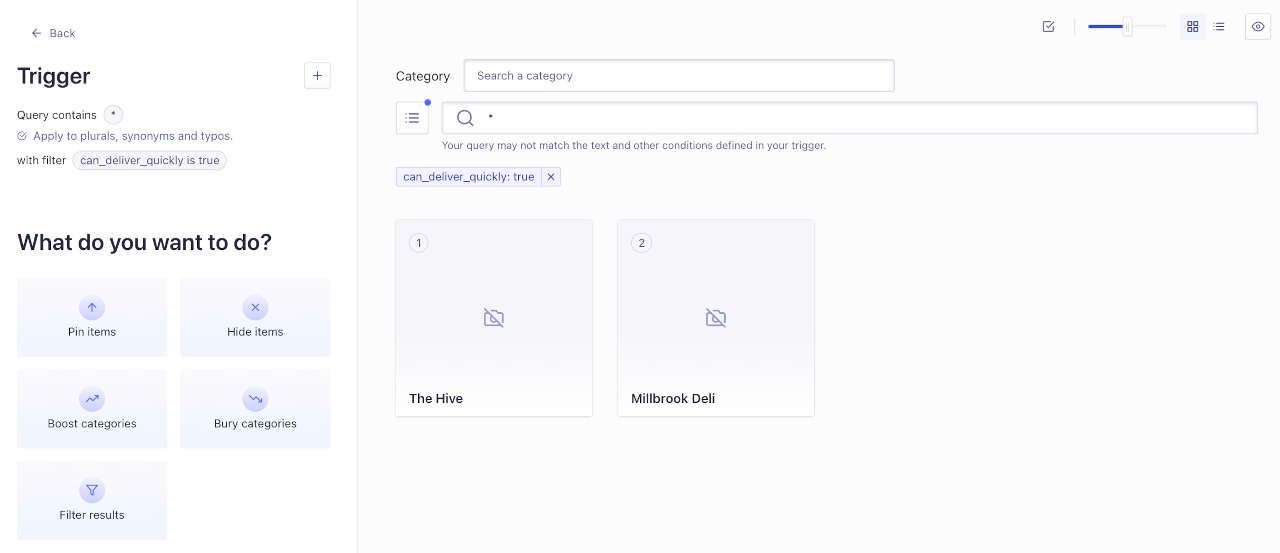
Although you can only filter at query time, you can test filters in the Rules Visual Editor before using them in your code.
- Go to your dashboard and select your index.
- Click Rules in the sidebar
- Create a new Rule and choose Visual Editor.
- Click the Set query condition(s) button under It all starts here.
- Click Filters and in Filter Name type
can_deliver_quickly - In Value, type
true - Type something into the Query box, such as
*(to display all matching records), and then click the Apply button.
Using the ‘can delivery quickly’ dataset and a query of *, two of three records are displayed.
Using the API
First, you need to set can_deliver_quickly and restaurant as attributesForFaceting. This happens at indexing time.
1
2
3
4
5
6
$index->setSettings([
  'attributesForFaceting' => [
    "can_deliver_quickly",
    "restaurant"
  ]
]);
Then, you can send the optional filters with your query.
1
2
3
4
5
$results = $index->search("hungry", [
  'optionalFilters' => [
    "can_deliver_quickly:true"
  ]
]);
If you want to disfavor a specific restaurant, you can add a negative optional filter on the restaurant attribute.
1
2
3
4
5
$results = $index->search("hungry", [
  'optionalFilters' => [
    "restaurant:-Bert's Inn"
  ]
]);
As an alternative, you can use facet filters. Click the Add Query Parameter button, go to the Filters tab and enter your targeted facet filters.
