Image Classification and Tagging
On this page
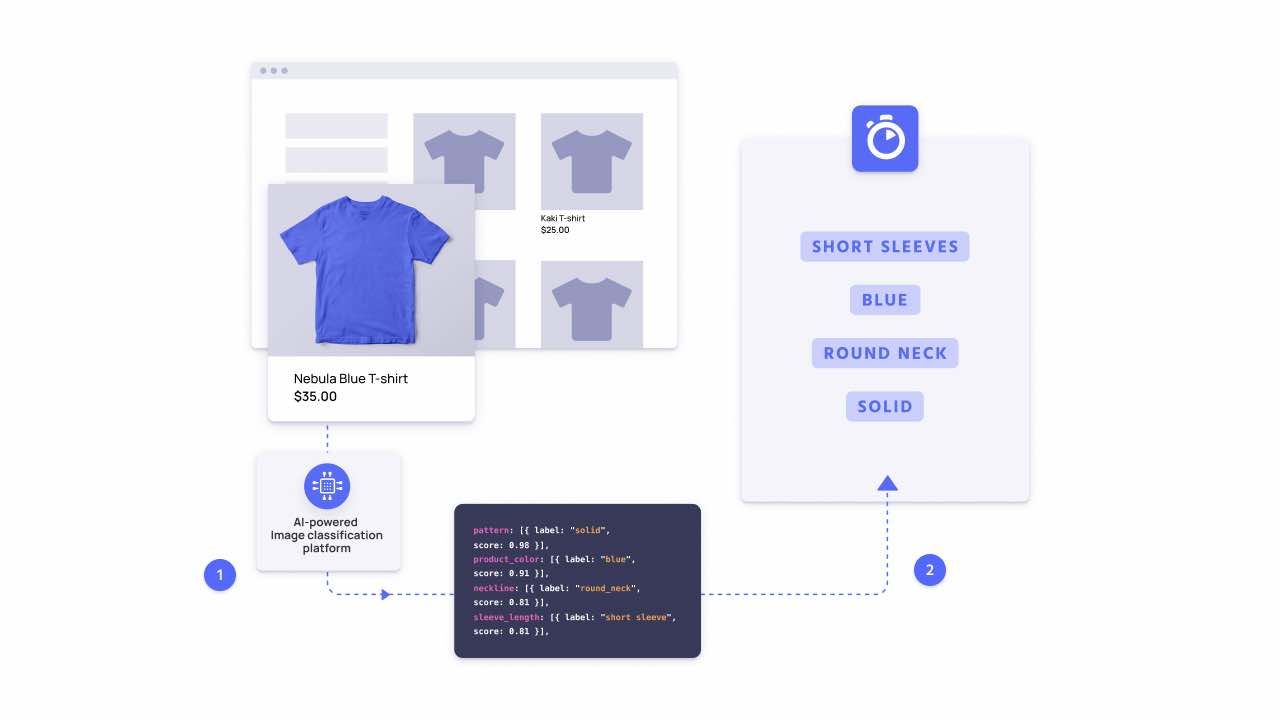
Image classification and tagging lets you extract meta information from product images. Whether you plan on implementing search by image or not, enriching your ecommerce dataset through image classification can lead to a more relevant search and discovery experience.
Why use image classification?
Retailers spend a lot of time building their catalogs. To offer a relevant search and discovery experience, they often manually classify each item, adding meta features like item type, material, style, etc. Removing some of this manual work lets you focus on the data that is important to your business—for example price, stock quantity, and popularity.
Visual recognition enables automatic extraction of this information by analyzing each product image. It makes feature tagging more consistent. For example, you may have various names for the color “blue” within your product descriptions. Item descriptions could include “cerulean” or “sapphire,” but not “blue”.
Without consistently having an attribute with the value “blue,” you could fail to surface all relevant products to your users when they filter on or search for “blue” items. Image classification lets you add the “blue” tag consistently for all blue products.
Image classification is particularly valuable in C2C marketplaces where users may not describe their products consistently nor fully. Tags from image classification can increase the number of product attributes, increasing their discoverability.
Image classification is valuable not only in C2C marketplaces, but anywhere your team is manually tagging different features like “type,” “neckline,” and “sleeve length.”
What does image classification and tagging entail?
This guide outlines how to use a third party API or platform to classify images and enrich your Algolia records using these classifications. It provides examples for Google Cloud Vision API and ViSenze, but the process is the same for other providers like Amazon Rekognition.
The goal is to enrich your records so that each one includes additional descriptive text. This text comes from running the product image through an image classifier, which returns classifications. Another way of thinking of classifications is “tags” or “labels.” By adding these classifications to your Algolia records, you make it easier to surface them in searches, whether the user is searching with text or images.
Enriching your records with classifications is a two-step process:
- Image classification - sending image URLs to a third-party image recognition platform to retrieve classifications.
- Indexing - adding the relevant classification information to your Algolia records.
If your end goal is to implement searching by image, you must first enrich your records using the same image recognition platform you plan to use for searching by image. Without first enriching your records, when a user provides an image as a search query, it won’t be able to match relevant records with the same or similar image.
Platform considerations
Google Cloud Vision API is an all-purpose image recognition API. Since it draws from a large corpus of image data, it can give a wide variety of classifications with high accuracy. The downside is that the classifications it provides aren’t highly specialized or structured.
All-purpose image recognition platforms can introduce irrelevant classifications. An image of model wearing a t-shirt could return relevant classifications, like “t-shirt” and the color and style of shirt, but it could also return classifications like “neck” and “arm,” if these are present in the image. Google Cloud Vision API returns tags and confidence scores of all objects that it identifies in an image.
If a platform exists for your particular use case, for example ViSenze for fashion retail, it’s best to use the specialized platform over the general one. Using case specific platforms usually produces better classifications. These platforms tailor their classifications to industry relevant terms and structure them consistently.
For example, ViSenze would take an image of a model wearing a t-shirt and identify all fashion related objects only, excluding objects like “neck” and “arm.” For each included item—”t-shirt,” for example—it returns relevant attributes like “neckline,” “fit,” and “sleeve length,” and their values: “v-neck,” “trim,” and “short,” respectively. You can be sure that all shirt images retrieve these same attributes in the same structure.
Solution requirements
| Difficulty |
|
| Prerequisites | Algolia records each containing an image URL, access to an image recognition platform such as Google Cloud Vision API |
Algolia doesn’t search in your original data source, but in the data you index to Algolia. Algolia accepts and stores JSON data, meaning it doesn’t store image files. Instead, it’s common to index an image URL, so that you can display the image in your results.
1
2
3
4
5
{
  "title": "Men's Athletic Shirt",
  "objectID": "807281751",
  "imageURL":"https://images-na.ssl-images-amazon.com/images/I/41uIVaJOLdL.jpg",
}
This is a truncated example—your records probably have other attributes like price, stock, sales rank, and other relevant information.
This guide assumes that you already have an Algolia index of products, and that each record has an attribute containing an image URL of the product.
Image classification
Image classification takes an image and returns a set of classifications or labels for it. Thanks to advances in AI, image classification is getting better and easier for non-experts to use. When using the Google Cloud Vision API, ViSenze, or other similar platforms, it can be as straightforward as feeding the platform an image URL and receiving the classifications in its response.
Using Google Vision API
If you haven’t already, create a Google Account and enable the Google Vision API for it. Set up authentication so that you can retrieve credentials and use the Vision API client library. The Google Vision API returns an array of classifications: JSON objects with different properties. Of these the description and score, which is how certain the API is about the description, are particularly useful.
After initializing an instance of Google Cloud Vision’s Node.js client, you can write a function to retrieve labels from an image URL. The example below creates a getImageLabels function that takes a public image URL, the Algolia record’s objectID, and a scoreLimit. The scoreLimit is the threshold for how certain the platform must be about an object to include it in the classifications.
Since score is a number between 0 and 1, the scoreLimit should be between 0 and 1 too. The higher the scoreLimit, the more certain the API must be about the label for it to be included.
You can write a function to retrieve just these or any other attributes you find useful. The getImageLabels example returns an object with a labels array. The array contains only label descriptions and scores, where scores were higher than the scoreLimit. The returned object also includes the original imageURL and objectID. The objectID is important for sending this data to your Algolia index later.
1
2
3
4
5
6
7
8
9
10
11
12
13
14
15
16
17
18
19
20
21
22
23
24
25
26
27
28
29
30
31
32
33
34
35
36
37
38
39
40
41
42
43
44
45
46
47
// Import the Google Cloud client libraries
const vision = require('@google-cloud/vision');

// Instantiate Google Vision client
const client = new vision.ImageAnnotatorClient();

// Retrieve labels
const getImageLabels = async (imageURL, objectID, scoreLimit) => {
  const [result] = await client.labelDetection(imageURL);
  const labels = result.labelAnnotations
    .filter(label.score > scoreLimit)
    .map( label => (
      {
        description: label.description,
        score:
      }
    ))
  return { imageURL, objectID, labels };
}

// const classifiedImage = await getImageLabels("https://images-na.ssl-images-amazon.com/images/I/41uIVaJOLdL.jpg", "439784001", 0.5)
{
  imageURL: "https://images-na.ssl-images-amazon.com/images/I/41uIVaJOLdL.jpg",
  objectID: "439784001",
  labels: [
    {
      "description": "Outerwear",
      "score": 0.9513528,
    },
    {
      "description": "Azure",
      "score": 0.89286935,
    },
    {
      "description": "Sleeve",
      "score": 0.8724504,
    },
    {
      "description": "Bag",
      "score": 0.86443543,
    },
    {
      "description": "Grey",
      "score": 0.8404184,
    }
  ]
}
When fetching images from HTTP(S)URLs, Google can’t guarantee that the request succeeds. Your request may fail if the specified host denies the request (for example, due to request throttling or denial of service prevention), or if Google throttles requests to the site for abuse prevention. Google advises against depending on externally hosted images for production applications.
Using ViSenze
When using a case specific platform like ViSenze, the general idea is the same. Setup an account and credentials, and send public image URLs to their Recognition API to receive classifications. You need to tailor your function to the data structure the platform returns.
For example, the getImageLabels function below takes a public image URL, the Algolia record’s objectID, and a scoreLimit. The scoreLimit is the threshold for how certain the platform must be about an object to include it in the classifications.
Since score is a number between 0 and 1, the scoreLimit should be between 0 and 1 too. The higher the scoreLimit, the more certain the API must be about the label for it to be included.
The function returns an object with an objects array. The objects array contains all relevant identified objects (for example, “t-shirt,” or “belt”) and their coordinates, labels, and scores.
The returned object also includes the original imageURL and objectID. The objectID is important for sending this data to your Algolia index later.
1
2
3
4
5
6
7
8
9
10
11
12
13
14
15
16
17
18
19
20
21
22
23
24
25
26
27
28
29
30
31
32
33
34
35
36
37
38
39
40
41
42
43
44
45
46
47
48
49
50
51
52
53
54
55
56
57
58
59
60
61
62
63
64
65
66
67
68
69
70
71
72
73
74
75
76
77
78
79
80
81

// Retrieve labels
const getImageLabels = async (imageURL, objectID, scoreLimit) => {
  const formData = new FormData();

  formData.append("limit", "30");
  formData.append("tag_group", "fashion_attributes");
  formData.append("url", imageURL);

  return await fetch("https://virecognition.visenze.com/v1/image/recognize", {
    method: "POST",
    headers: {
      Authorization: "Basic YOUR_BASE64_ENCODED_VISENZE_KEY",
    },
    body: formData,
  })
    .then((res) => res.json())
    .then((res) => {
      if (res.status !== "OK" && res.error[0]) {
        console.log("handle ViSenze - recognition error", res.error[0]);
        return;
      }

      const classifiedImage = {
        imageURL,
        objectID,
        objects: [],
      };

      // `res.result[0].objects` contains the objects detected in the image
      res.result[0].objects.forEach((object, index) => {
        // Store coordinates of the current object
        classifiedImage.objects[index] = {
          x1: object.box[0],
          y1: object.box[1],
          x2: object.box[2],
          y2: object.box[3],
        };

        // Format categories, attributes and scores
        object.tags.forEach(({ tag, score }) => {
          const splittedTag = tag.split(":");
          score = parseFloat(score.toFixed(2));

          if (score > scoreLimit) {
            if (!(splittedTag[0] in classifiedImage.objects[index])) {
              classifiedImage.objects[index][splittedTag[0]] = [];
            }

            classifiedImage.objects[index][splittedTag[0]].push({
              label: splittedTag[1],
              score,
            });
          }
        });
      });

      return classifiedImage;
    }).catch((err) => console.log("Image classification error", err));
};

// const classifiedImage = await getImageLabels("https://images-na.ssl-images-amazon.com/images/I/41uIVaJOLdL.jpg", "439784001", 0.5)
{
  imageURL: "https://images-na.ssl-images-amazon.com/images/I/41uIVaJOLdL.jpg",
  objectID: "439784001",
  objects: [
      {
        x1: 65,
        y1: 14,
        x2: 729,
        y2: 788,
        apparel: [{ label: "upper_body_garment", score: 0.98 }],
        product_color: [{ label: "blue", score: 0.91 }],
        neckline: [{ label: "round_neck", score: 0.81 }],
        ...
          // This is a truncated list of classifications.
          // Other classifications include category, closure_type, denim_wash_color, lower_body_garment, lower_body_length, outerwear, pants_fit_type, product_pattern, rise_type, sleeve_length, sleeve_style, upper_body_garment, upper_body_length
      },
    ...
  ],
}
Indexing image classifications
Once you’ve retrieved the classifications from your third-party image recognition platform, you need to index them to Algolia. You can include classifications either when you initially index your data, or within the context of the browse method. The browse lets you retrieve your data and update it according to your needs.
Using Google Vision API
This example uses of the getImageLabels function from the classification section to retrieve labels for each record while using browse. It then uses the partialUpdateObjects method to add the labels to the record.
1
2
3
4
5
6
7
8
9
10
11
12
13
14
15
16
17
18
19
20
21
22
// Import the Algolia client library
const algolia = require("algoliasearch");

// Instantiate Algolia client and index
// API key ACL should include editSettings / addObject
const client = algolia("your_app_id", "your_admin_api_key");
const index = client.initIndex("products");

// Browse and update records
index
  .browseObjects({
    batch: async (batch) => {
      let updates = await Promise.all(
        batch.map(
          async (hit) => await getImageLabels(hit.imageURL, hit.objectID, 0.5)
        )
      );
      index.partialUpdateObjects(updates);
    },
  })
  .then(() => console.log("Labels indexed"));
  .catch((err) => console.log("Error indexing", err));
With this completed, each product record has a labels attribute:
1
2
3
4
5
6
7
8
9
10
11
12
{
  "title": "Men's Athletic Shirt",
  "objectID": "807281751",
  "imageURL":"https://images-na.ssl-images-amazon.com/images/I/41uIVaJOLdL.jpg",
  "labels":[
    {
      "description": "Outerwear",
      "score": 0.9513528,
    },
    ...
  ]
}
To enable your users to textually search by label descriptions, you need to add labels.description to your searchableAttributes.
To implement search by image, or if you want to filter on labels, you must include labels.description in attributesForFaceting.
Using ViSenze
This example uses of the getImageLabels function from the classification section to retrieve labels for each record while using browse. It then uses the partialUpdateObjects method to add the labels to the record.
It then updates the index settings to include each object’s labels in attributesForFaceting and searchableAttributes.
1
2
3
4
5
6
7
8
9
10
11
12
13
14
15
16
17
18
19
20
21
22
23
24
25
26
27
28
29
30
31
32
33
34
35
36
37
38
39
40
41
42
43
44
45
46
47
48
49
50
51
52
53
54
55
56
57
58
59
60
61
62
// Import the Algolia client library
const algolia = require("algoliasearch");

// Instantiate Algolia client and index
// API key ACL should include editSettings / addObject
const client = algolia("your_app_id", "your_admin_api_key");
const index = client.initIndex("products");

// Browse and update records
index
.browseObjects({
  batch: async (batch) => {
    const hits = await Promise.all(
      batch.map(
        async (hit) => await getImageLabels(hit.imageURL, hit.objectID, 0.5)
      )
    );
    // Update records with image classifications
    index
      .partialUpdateObjects(hits)
      .wait()
      .then(() => {
        const facets = [];
        const attributes = [];
        hits.forEach((hit) => {
          hit.objects.forEach((object) => {
            for (const [key, values] of Object.entries(object)) {
              if (Array.isArray(values)) {
                facets.push(
                  `searchable(objects.${key}.label)`,
                  `searchable(objects.${key}.score)`
                );
                attributes.push(`objects.${key}.label`);
              }
            }
          });
        });
        // Retrieve and update index settings
        index.getSettings()
          .then((settings) => {
              let attributesForFaceting = settings.attributesForFaceting;
              let searchableAttributes = settings.searchableAttributes;
              if (facets.length){
                  attributesForFaceting = attributesForFaceting.concat(facets)
              }
              if (attributes.length){
                searchableAttributes = searchableAttributes.concat(attributes)
              }
              index
                .setSettings({
                  searchableAttributes,
                  attributesForFaceting,
                })
              .then((res) => console.log("Index updated", res))
              .catch((err) => console.log("Error setting index", err));
          })
          .catch((err) => console.log("Error retrieving index settings", err));
      })
      .catch((err) => console.log("Error adding new hits", err));
  },
})
.catch((err) => console.log("Error browsing index", err));
With this completed, your records contain the recognized objects with their coordinates, labels, and scores.
1
2
3
4
5
6
7
8
9
10
11
12
13
14
15
16
{
  imageURL: "https://images-na.ssl-images-amazon.com/images/I/41uIVaJOLdL.jpg",
  objectID: "439784001",
  objects: [
      {
        x1: 65,
        y1: 14,
        x2: 729,
        y2: 788,
        apparel: [{ label: "upper_body_garment", score: 0.98 }],
        product_color: [{ label: "blue", score: 0.91 }],
        neckline: [{ label: "round_neck", score: 0.81 }],
      },
    ...
  ],
}
Next steps
Enriching your data with image classifications can already lead to a more relevant search and discovery experience. You can take it further by building an experience that enables your users to search for products with images.

