Filter Suggestions
On this page
Facets are a great way to let your users refine their search, but it can be difficult for them to find the right ones if they see a long list of facets. A solution to this problem is to suggest facets based on your users’ already selected facets.
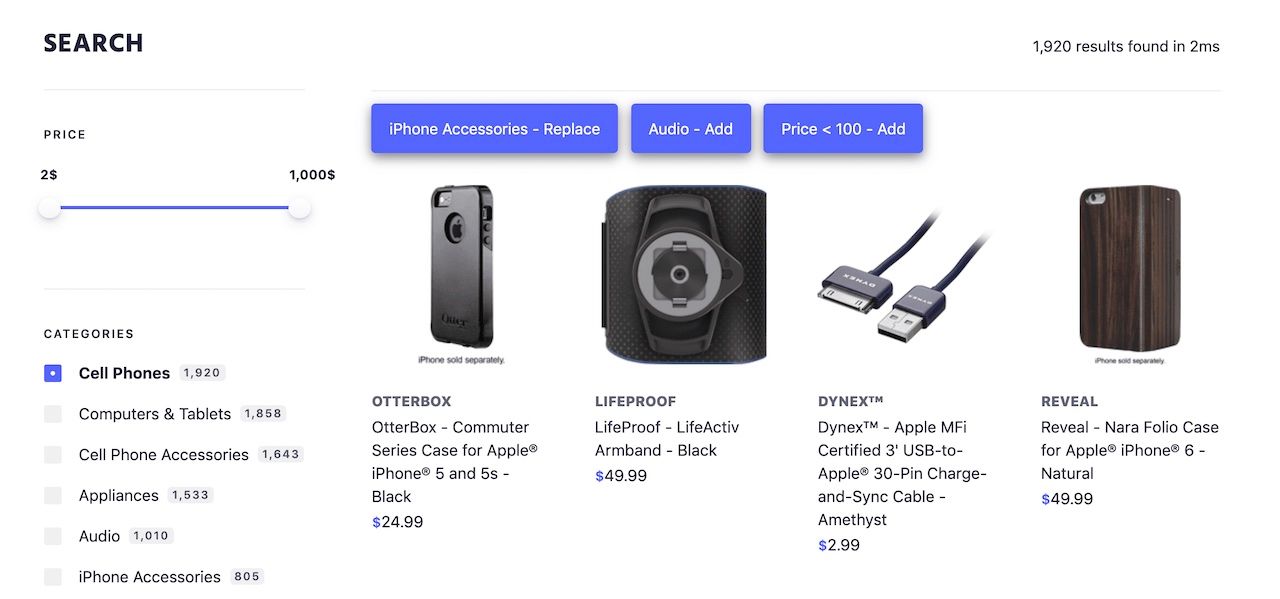
In this image, and in the live demo, you see three suggested filters above the search results after you click the Cell Phones facet: iPhone Accessories, Audio, and Price < 100. These extra filters guide the user to refine and improve the relevance of their results. The words Add and Replace give the user helpful information about the effect of clicking on the filter. For example, by clicking on iPhone Accessories - Replace, this automatically selects the iPhone Accessories facet and deselects Cell Phones.
Solution requirements
| Difficulty |
|
| Features | Rules |
| Prerequisites | Instant Search 4+ |
Implementation guide
In this guide, you build a classic ecommerce search page with a search box, two facets (category and price), and results. The interesting bit is that when your user selects the category ‘phone’, you suggest two filters: category: phone accessories and price <= 100.
There are three steps to implement this behavior:
- Create the Rules
- Display the filter suggestions (HTML)
- Retrieve and render the filter suggestions (JavaScript)
File and index structure
For this implementation, you need two files:
index.htmlsrc/app.js
You also need an Algolia index containing the ecommerce dataset. For this guide, name the index related_categories_example.
Create the Rule
First, define the filters you want to suggest for each category. The most flexible way to do this is with Rules, which you can create from the dashboard or using an API client.
Rules consist of two main parts: a condition that triggers the Rule, and a consequence that slightly alters the API response.
To create this Rule, follow these steps:
- Select the Rules section from the left sidebar menu in the Algolia dashboard.
- Under the heading Rules, select the index you are adding a Rule to.
- Select Create your first rule or New rule. In the dropdown, click on the Manual Editor option.
- In the Condition(s) section, set the context to
ais-categories-Cell_Phones(you set this context on the front end when your user clicks on the ‘phone’ category). - In the Consequence(s) section, set the following consequence:
- Click the Add consequence button and select Return Custom Data.
- In the input field that appears, copy and paste the JSON text below:
1
2
3
4
5
6
7
8
9
10
11
12
13
14
15
16
17
18
19
20
21
22
23
{
  "filters": [
    {
      "name": "iPhone Accessories - Replace",
      "type": "disjunctive",
      "filter": {
        "attribute": "categories",
        "value": "iPhone Accessories"
      },
      "clear": "true"
    },
    {
      "name": "Price < 100 - Add",
      "type": "numeric",
      "filter": {
        "attribute": "price",
        "operator": "<=",
        "value": 100
      },
      "clear": "false"
    }
  ]
}
If you are using one of the API clients, you should create the Rule with the following JSON.
1
2
3
4
5
6
7
8
9
10
11
12
13
14
15
16
17
18
19
20
21
22
23
24
25
26
27
28
29
30
31
32
{
  "condition": {
    "context": "ais-categories-Cell_Phones"
  },
  "consequence": {
    "userData": {
      "filters": [
        {
          "name": "iPhone Accessories - Replace",
          "type": "disjunctive",
          "filter": {
            "attribute": "categories",
            "value": "iPhone Accessories"
          },
          "clear": "true"
        },
        {
          "name": "Price < 100 - Add",
          "type": "numeric",
          "filter": {
            "attribute": "price",
            "operator": "<=",
            "value": 100
          },
          "clear": "false"
        }
      ]
    },
    "filterPromotes": true
  },
  "objectID": "xxx"
}
Update the HTML
In your index.html file, add the following containers.
1
2
3
4
5
6
7
8
9
10
11
12
<div class="search-panel">
  <div class="search-panel__filters">
    <div id="price"></div>
    <div id="categories"></div>
  </div>
  <div class="search-panel__results">
    <div id="searchbox"></div>
    <div id="stats"></div>
    <div id="additional-categories" class="ais-QueryRuleCustomData"></div>
    <div id="hits"></div>
  </div>
</div>
Update the JavaScript
In your app.js file, use the addWidgets method to add four widgets to the page: searchBox, hits, refinementList, and rangeInput.
1
2
3
4
5
6
7
8
9
10
11
12
13
14
15
16
17
18
19
20
21
22
23
24
25
26
27
28
29
30
31
32
search.addWidgets([
  instantsearch.widgets.searchBox({
    container: '#searchbox',
  }),
  instantsearch.widgets.hits({
    container: '#hits',
    templates: {
      item: `
        <article>
          <h1>{{#helpers.highlight}}{ "attribute": "name" }{{/helpers.highlight}}</h1>
          <p>{{#helpers.highlight}}{ "attribute": "description" }{{/helpers.highlight}}</p>
        </article>
      `,
    },
  }),
  instantsearch.widgets.pagination({
    container: '#pagination',
  }),
  instantsearch.widgets.stats({
    container: '#stats',
  }),
  instantsearch.widgets.refinementList({
    container: '#categories',
    attribute: 'categories'
  }),
  instantsearch.widgets.rangeInput({
    container: '#price',
    attribute: 'price'
  }),

  /* two additional widgets to add here, see below */
]);
Now, you have to set the Rule context whenever your user selects a facet, so that it changes when they select the ‘phone’ category. You can do this by adding the queryRuleContext widget.
1
2
3
4
5
instantsearch.widgets.queryRuleContext({
  trackedFilters: {
    categories: values => values
  }
})
Next, add the queryRuleCustomData widget to parse the Rule’s response and render the filter suggestions.
1
2
3
4
5
6
7
8
9
10
11
12
13
14
15
16
17
18
19
20
21
22
23
24
25
26
instantsearch.widgets.queryRuleCustomData({
  container: '#additional-categories',
  transformItems: function(items){
    if(items.length > 0){
      let transformedFilters = items[0].filters.map(function(item){
        if(typeof item.filter === 'object'){
          item.filter = JSON.stringify(item.filter);
        }
        return item;
      });
      return [{filters: transformedFilters}];
    }
    else {
      return items;
    }
  },
  templates: {
    default: `
    {{#items}}
      {{#filters}}
        <button class="additional-filter" data-filter="{{filter}}" data-filter-type="{{type}}", data-clear-filters="{{clear}}">{{name}}</button>
      {{/filters}}
    {{/items}}
    `
  }
})
Finally, you have to refine the search results when your user clicks one of the filter suggestions.
1
2
3
4
5
6
7
8
9
10
11
12
13
14
15
16
17
18
19
20
21
document.addEventListener('click', function(event){
  if(event.target.classList.contains('additional-filter')){
    let helper = search.helper;
    let data = event.target.dataset;
    let filter = JSON.parse(data.filter);
    if(data.clearFilters == 'true'){
      helper.clearRefinements();
    }

    if(data.filterType === 'disjunctive'){
      helper.addDisjunctiveFacetRefinement(filter.attribute, filter.value);
    }
    if(data.filterType === 'numeric'){
      helper.removeNumericRefinement(filter.attribute);
      helper.addNumericRefinement(filter.attribute, filter.operator, filter.value);
    }

    helper.search();

  }
});
Next steps
With this solution in place, it’s possible to add new suggestions of filters by creating new Rules, without any extra coding. This guides your users to even more relevant results.

