Dynamic Product Carousels
On this page
There are two types of carousel solutions:
- Static, where hard-coded values defines the carousels used in the solution. This means that changes to the list of carousels require an update to your code.
- Dynamic, where your Algolia index defines the carousels. This enables you to control the list of carousels from the Algolia dashboard, with no need to recode.
This tutorial outlines the dynamic approach.
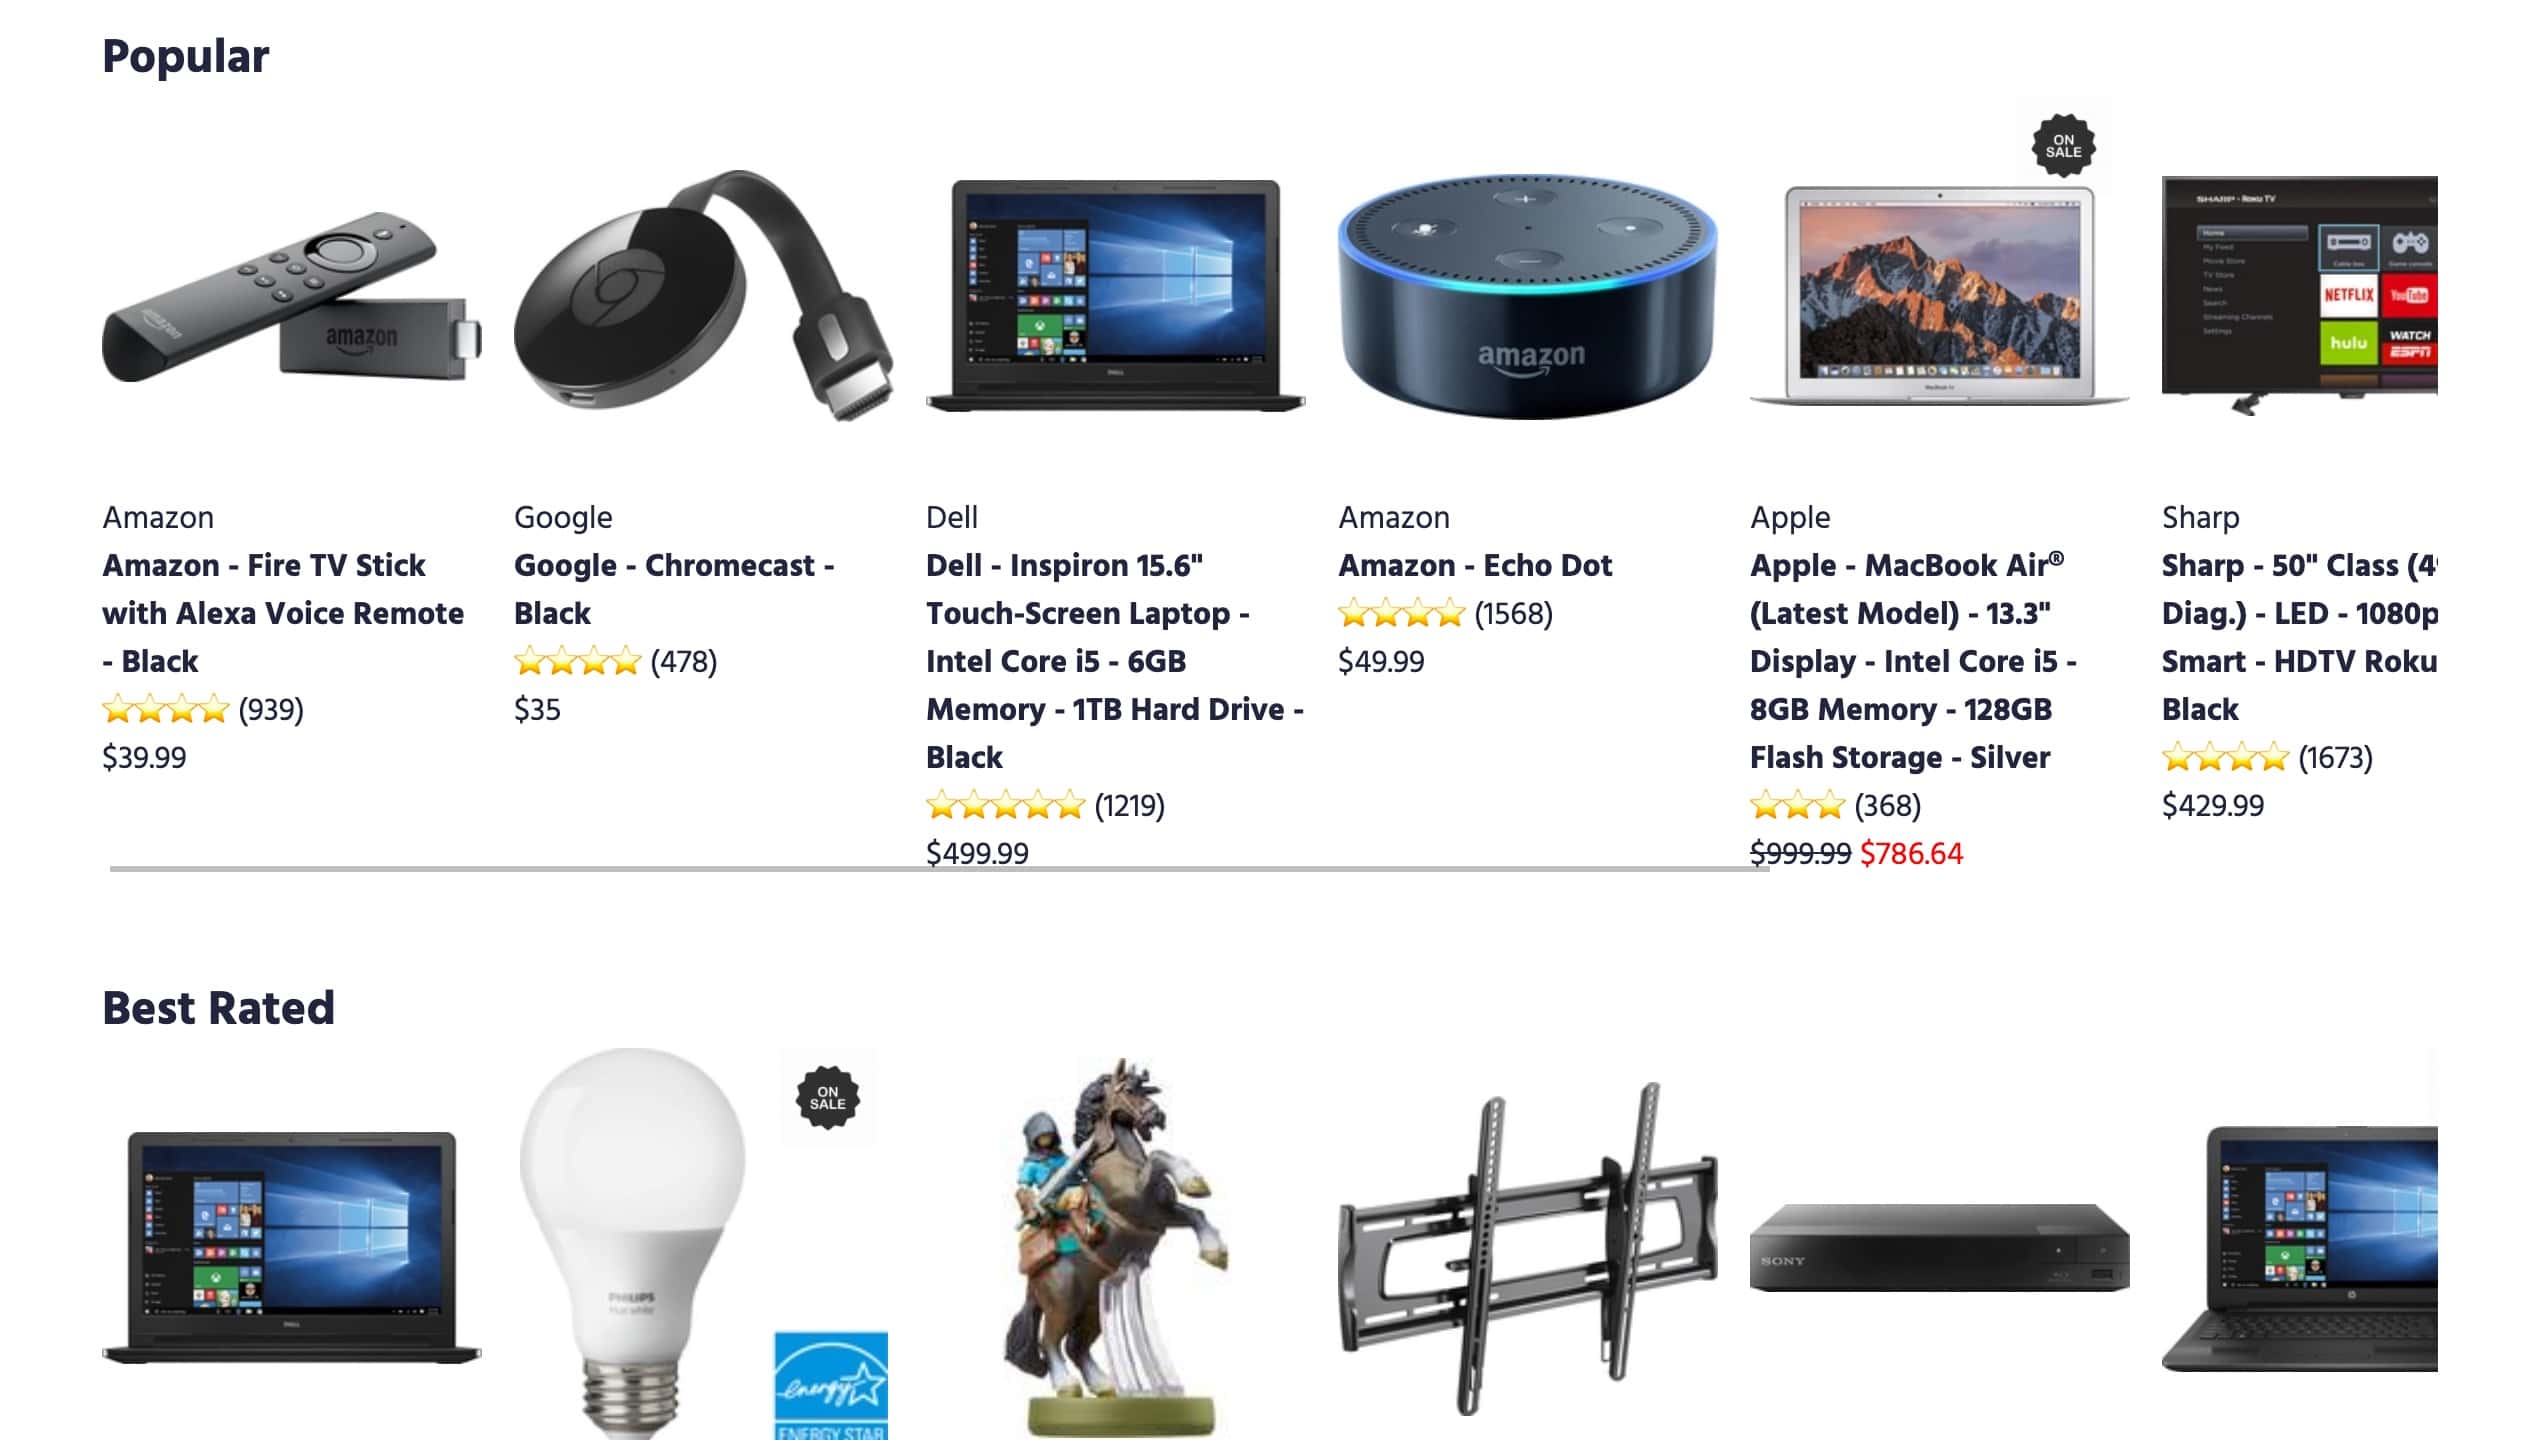
Carousels (also called shelves, lanes, or aisles) organize your products and results within categories. Rather than overwhelming users with a large grid of items, carousels group items into easily scannable rows like “most popular,” “best rated,” and “on sale.”
Carousels are highly customizable: you can adjust their categories, order, and content.
Solution requirements
| Difficulty |
|
| Plan | Premium for a personalized carousel |
| Features | Rules, Personalization |
| Prerequisites | Instant Search 4+ |
Implementation guide
This guide shows you how to display products in five different carousels: “Popular,” “Best rated,” “On sale,” “These might interest you,” and “Gifts for Black Friday.”
You need these four files:
index.htmlsrc/main.jssrc/carousel.jssrc/style.css
Indices to display the carousels
You need two Algolia indices containing the product dataset:
- A primary index, with a custom ranking on the
popularityattribute of the products. Name this indexe_commerce_transformed. - A replica of the
e_commerce_transformedindex, with a custom ranking on thepopularityattribute. Name this indexe_commerce_transformed_rating_desc. Use this index for the “best rated” carousel.
You can download the JSON of the e_commerce_transformed index, located in the src/ folder.
In addition to the two indices used to store the product dataset, the dynamic solution uses a third Algolia index called e_commerce_transformed_config to define the content of the carousels and their order on the page. With this index, you manage your carousels directly in the dashboard without needing to change your front-end code. You can download the JSON of the e_commerce_transformed_config index, located in the src/ folder.
Configuring each carousel
To dynamically generate the carousels, you can store each carousel’s configuration in the e_commerce_transformed_config index. For this demo, the index has five records, one for each carousel. Each record has attributes that define the title of the carousel, the index in indexName, and any query parameters in configure pertinent to the carousel.
The carousel section walks you through four typical carousels. They all rely on the records in the e_commerce_transformed_config index. Here’s an example record:
1
2
3
4
5
6
7
8
9
{
    "title":"Popular",
    "indexName":"e_commerce_transformed",
    "configure":{
        "hitsPerPage":10
    },
    "order":1,
    "objectID":"popular"
},
You need to set up order as a custom ranking attribute. Doing so orders the shelves on the front end. You learn about the other attributes as you go through the tutorial.
Adapting the HTML
In your index.html file, add the following div as a placeholder for your dynamically generated carousels.
1
<div id="carousel-container" class="carousel-container"></div>
Rendering the carousels
This section explains how to render the carousels dynamically, by creating a new index widget for each carousel.
- Use
src/main.jsto render the carousel widgets. - Use
src/carousel.jsto define the carousel widget.
Define how to display the carousels
Define the display logic for every carousel in src/carousel.js. This file creates the widget that you append to the carousel-container defined in index.html.
Create a renderCarousel function that targets the containers and appends them with the hits you want to display:
- Target the carousel container.
- Create an
<h2>header that displays the title of the carousel. - Add a
<ul>tag in the container when you render the carousel for the first time. - Inside the
<ul>element, add<li>tags for each movie you want to display.
Here is the full rendering code.
1
2
3
4
5
6
7
8
9
10
11
12
13
14
15
16
17
18
19
20
21
22
23
24
25
26
27
28
29
30
31
32
33
34
35
36
37
38
39
40
41
export const carousel = connectHits(function renderCarousel(
  { widgetParams: { container, title }, hits },
  isFirstRender
) {
  if (isFirstRender) {
    const section = document.createElement('section');
    container.appendChild(section);
    const h2 = document.createElement('h2');
    h2.innerText = title;
    section.appendChild(h2);
    const ul = document.createElement('ul');
    ul.classList.add('carousel-list-container');
    section.appendChild(ul);
  }

  container.querySelector('ul').innerHTML = hits
    .map(
      (hit) => `
      <li>
          ${
            hit.onSale
              ? `<img class="on-sale" src="${onSaleImg}" alt="">`
              : ''
          }
          <img src="${hit.image}" alt="${hit.name}">
          <span>${hit.brand}</span>
          <a href="#">
            <h3>${hit.name}</h3>
          </a>
          <p>${[...Array(hit.rating === 0 ? 1 : hit.rating).keys()]
            .map(() => '⭐️')
            .join('')}  (${hit.ratingsNumber})</p>
            <p><span ${
              hit.onSale ? 'style="text-decoration: line-through"' : ''
            }>$${hit.price}</span> ${
              hit.onSale ? `<span style="color: red">$${hit.newPrice}</span>` : ''}</p>
      </li>
      `
    )
    .join('');
  });
Render the carousel widgets
The following function returns an array of all carousel widgets.
1
2
3
4
5
6
7
8
9
function getCarousels() {
  return searchClient
    .initIndex('e_commerce_transformed_config')
    .search('', {
      attributesToHighlight: [],
      attributesToRetrieve: ['title', 'indexName', 'configure'],
    })
    .then((res) => res.hits);
}
Next, loop through the array and do the following:
- Execute a search on the index associated with the carousel, using any search parameters defined in the widget.
- Create the widget with the results obtained.
- Append the
carouselwidget to thecarouselContainer.
Here is the full loop.
1
2
3
4
5
6
7
8
9
10
11
12
13
14
15
16
17
18
19
20
21
22
23
24
25
26
27
28
29
30
31
32
33
34
35
36
37
38
39
40
getCarousels().then((carousels) => {
  const container = document.querySelector('#carousel-container');

  search.addWidgets(
    carousels.map((carouselConfig) => {
      const carouselContainer = document.createElement('div');

      const indexWidget = index({
        indexName: carouselConfig.indexName,
        indexId: carouselConfig.objectID,
      });

      if (carouselConfig.configure) {
        indexWidget.addWidgets([
          configure({
            ...carouselConfig.configure,
            // replace user token with the user's one if set by configure
            userToken: carouselConfig.configure.userToken
              ? getUserToken()
              : undefined,
          }),
        ]);
      }

      indexWidget.addWidgets([
        carousel({
          title: carouselConfig.title,
          container: carouselContainer,
        }),
      ]);

      container.appendChild(carouselContainer);

      return indexWidget;
    })
  );

  // only start _after_ carousels have been added
  search.start();
});
This is all the coding you need to do. The rest of this solution describes how to use the records in e_commerce_transformed_config to create the different carousels.
Creating the carousels
This tutorial offers five examples of carousels. Some apply different sorting strategies. Others require Personalization and/or Rules.
You need to define each of these carousels as records in the e_commerce_transformed_config index. To do so, you can add the JSON snippets in the following sections to that index. You don’t have to do any further front-end development.
Most popular products
This carousel displays the most popular products.
The carousel targets the index that sorts results by popularity (e_commerce_transformed). The code limits the number of results (8) and display the carousel in the correct container (#carousel-most-popular). You also need to provide the indexID property, because other carousels target the same index.
Place the following record in the e_commerce_transformed_config index.
1
2
3
4
5
6
7
8
9
{
  "title":"Popular",
  "indexName":"e_commerce_transformed",
  "configure":{
      "hitsPerPage":10
  },
  "order":1,
  "objectID":"popular"
}
Best rated products
This carousel displays best rated products.
The JSON is the same as the carousel that displays the most popular products. The difference is the targeted index: the replica called e_commerce_transformed_rating_desc. This replica ranks its records differently:
- It uses
ratingsas a sort-by attribute. - It uses
ratingsNumberas custom ranking attribute.
Place the following record in the e_commerce_transformed_config index.
1
2
3
4
5
6
7
8
9
{
  "title":"Best Rated",
  "indexName":"e_commerce_transformed_rating_desc",
  "configure":{
      "hitsPerPage":10
  },
  "order":2,
  "objectID":"best-rated"
}
On sale items
This carousel displays a list of products that are on sale. To do this, it uses the onSale attribute.
Like the first two carousels, it sets up the query. The unique part here is that the rendering code in the creating a render function section conditions the display with onSale=true.
Place the following record in the e_commerce_transformed_config index.
1
2
3
4
5
6
7
8
9
10
{
  "title":"On Sale",
  "indexName":"e_commerce_transformed",
  "configure":{
      "hitsPerPage":10,
      "filters": "onSale:true"
  },
  "order":3,
  "objectID":"on-sale"
}
These might interest you
This carousel displays a list of products personalized to each user’s taste. To do this, it leverages Algolia’s Personalization feature. Please make sure your plan has access to Personalization before trying to implement this.
For Personalization to work, you need to configure two extra search parameters for the carousel:
enablePersonalizationto enable Personalization for this search.userTokento specify the user you personalize for.
Place the following record in the e_commerce_transformed_config index.
1
2
3
4
5
6
7
8
9
10
11
{
  "title":"These might interest you",
  "indexName":"e_commerce_transformed",
  "configure":{
      "hitsPerPage":10,
      "enablePersonalization":true,
      "userToken": "samsung_fan"
  },
  "order":4,
  "objectID":"these-might-interest-you"
}
Gifts for Black Friday
This carousel displays products that users can offer as gifts on Black Friday. To accomplish this, you need to create a Rule, either in the dashboard or with the API.
Using the dashboard
To create this Rule in the dashboard, follow these steps:
- Select the Rules section from the left sidebar menu in the Algolia dashboard.
- Under the heading Rules, select the index you are adding a Rule to.
- Select Create your first rule or New rule. In the dropdown, click on the Manual Editor option.
- In the Condition(s) section, click on Context, enter the text “carousel_black_friday”.
- In the Consequence(s) section:
- Click the Add consequence button and select Add Query Parameter.
- In the input field that appears, enter the following JSON search parameter.
Copy
1
2
3
{
"filters": "onSale:true AND popularity>=21000"
}
- Click the Add consequence button and select Pin an item.
- Find the product ‘1319385’, click ‘2’, and press
Enter. - Find the product ‘5197004’, click ‘3’, and press
Enter. - Find the product ‘5327500’, click ‘4’, and press
Enter. - Find the product ‘4826902’, click ‘7’, and press
Enter. - Find the product ‘8945804’, click ‘8’, and press
Enter. - Find the product ‘4374300’, click ‘12’, and press
Enter.
- Don’t forget to save your changes.
Using an API client
If you use the API to create your Rule, use the saveRule method with the following Rule structure:
1
2
3
4
5
6
7
8
9
10
11
12
13
14
15
16
17
18
19
20
21
22
23
24
25
26
27
28
29
30
31
32
33
34
35
36
37
38
39
40
41
42
43
44
45
46
47
48
49
50
51
52
53
54
55
56
57
58
59
60
{
  "enabled": true,
  "tags": [
    "visual-editor"
  ],
  "description": "gift black friday / high popularity + On sale",
  "conditions": [
    {
      "anchoring": "is",
      "pattern": "",
      "alternatives": false,
      "context": "carousel_black_friday"
    }
  ],
  "consequence": {
    "promote": [
      {
        "objectIDs": [
          "4826902"
        ],
        "position": 6
      },
      {
        "objectIDs": [
          "5327500"
        ],
        "position": 3
      },
      {
        "objectIDs": [
          "1319385"
        ],
        "position": 1
      },
      {
        "objectIDs": [
          "4374300"
        ],
        "position": 11
      },
      {
        "objectIDs": [
          "5197004"
        ],
        "position": 2
      },
      {
        "objectIDs": [
          "8945804"
        ],
        "position": 7
      }
    ],
    "params": {
      "filters": "\"onSale\":\"true\" AND \"popularity\">=21000"
    },
    "filterPromotes": true
  },
  "objectID": "qr-1606321675053"
}
Then, you have to set up the carousel with the carousel_black_friday Rule with the correct context. Do this using the ruleContexts parameter.
Place the following record in the e_commerce_transformed_config index.
1
2
3
4
5
6
7
8
9
10
{
  "title":"Gifts for Black Friday",
  "indexName":"e_commerce_transformed",
  "configure":{
      "hitsPerPage":10,
      "ruleContexts":"carousel_black_friday"
  },
  "order":5,
  "objectID":"gifts-for-black-friday"
}
Next steps
Add more carousels. Now that you know how to set up product carousels, you can create a variety of carousels for your project. This helps improve user engagement with your products.

