How to Configure Your First Crawler
Running your first crawl takes a couple of minutes. The default configuration extracts some common attributes, such as a title, a description, headers, and images. You want to change and optimize it for your own website:
- The default extractor might not work as-is with your website, if the data isn’t formatted the same way.
- You want to extract more content so your users can discover it.
From this how-to guide, you can understand how the Algolia blog default configuration works, and see several tips and tricks to build and optimize your crawler.
What’s the crawler configuration API?# A
You can find a full reference for the Crawler Configuration API. To edit your Crawler’s configuration, use the code editor in the Crawler Admin. You can also test your current crawler configuration with the Test URL section of the code editor.
How do you access a crawler’ configuration?#
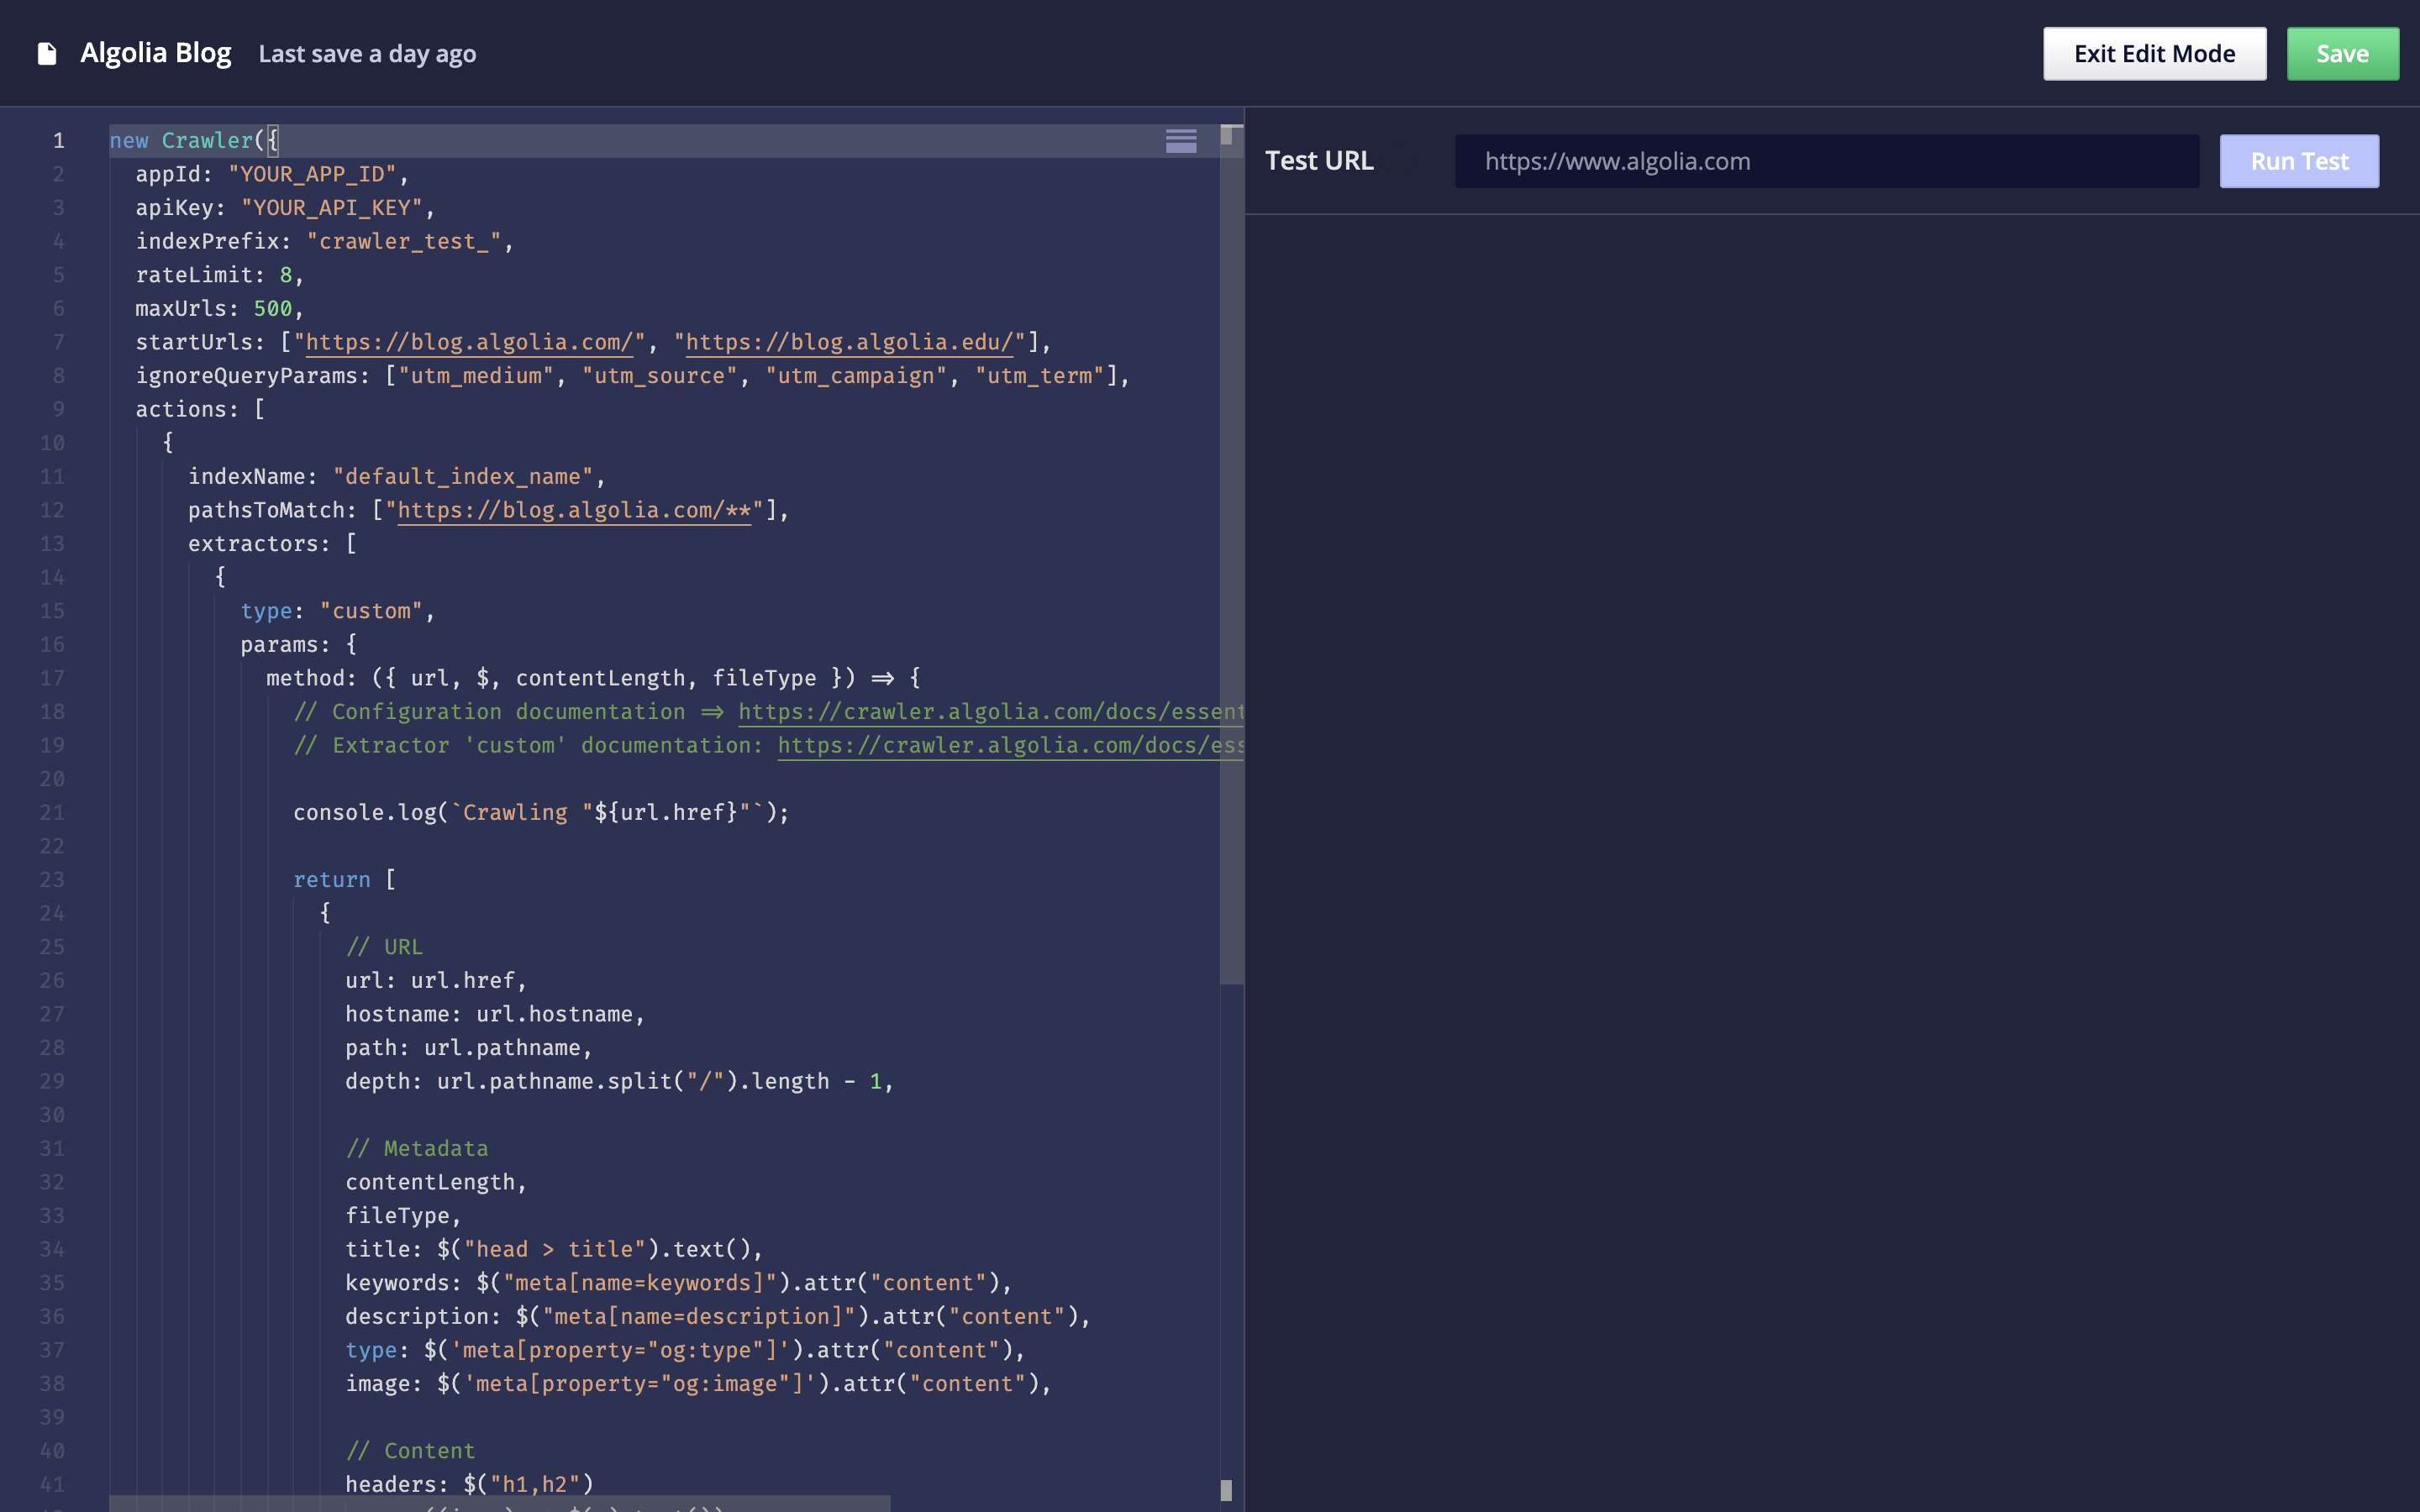
You can access the crawler’s configuration through the Editor tab of the Crawler Admin. After selecting or creating a crawler, click on the Editor tab. This takes you to an in-browser code editor.
The file that you edit in-browser is the configuration file. This file has your crawler object, and the listed parameters are in the Crawler Configuration API.
How do you use the Configuration API?#
You can consult the complete Configuration API reference. To edit your Crawler’s configuration, use the code editor in the Crawler Admin. You can also test your current crawler configuration with the Test URL section of the code editor.
Configuring the entry points# A
startUrls#
Giving the correct entry points to the crawler is crucial. The default configuration has the base URL set when creating a crawler. Running the crawler as-is displays some discovered pages. All the discovered pages aren’t displayed because the homepage of the Algolia blog displays the most recent articles. The See More button at the bottom of the page dynamically loads more posts.
The Crawler can’t interact with web pages. For that reason, it’s limited to the first set of articles displayed on the homepage.
The best solution in this case is to rely on a sitemap.
sitemaps#
One of the first things to look for when you want to exhaustively crawl a website is whether a sitemap is available. Sitemaps are specifically intended for web crawlers, they give a complete list of all relevant pages it needs to browse. When using a sitemap, you’re sure that your crawler is capturing all URLs.
The location of the sitemap is in the robots.txt file. This is a standard file located at the root level of a website and informs the web crawlers which areas of the website they’re allowed to visit.
Sitemaps go to the root level of the website too, in a file named sitemap.xml.
Remove the startUrls and instead add the Algolia blog sitemap to your configuration:
1
2
3
4
5
new Crawler({
- startUrls: ["https://blog.algolia.com/"],
+ sitemaps: ["https://blog.algolia.com/sitemap.xml"],
  // ...
});
Add this sitemap to your crawler configuration and run a new crawl. Several hundred records display.
Finding data on web pages# A
After indexing your blog pages, look at putting more data into your generated records, to improve discoverability.
CSS selectors#
The main way to extract data on a web page is by using a CSS selector. To find the correct one, browse the URLs you want to crawl and scroll to the information you want to extract. Here, you want to get the author of each article:
- Right click on the text to extract and select Inspect Element (or Inspect).
- In the browser console, right click on the highlighted HTML node and select Copy > CSS Selector
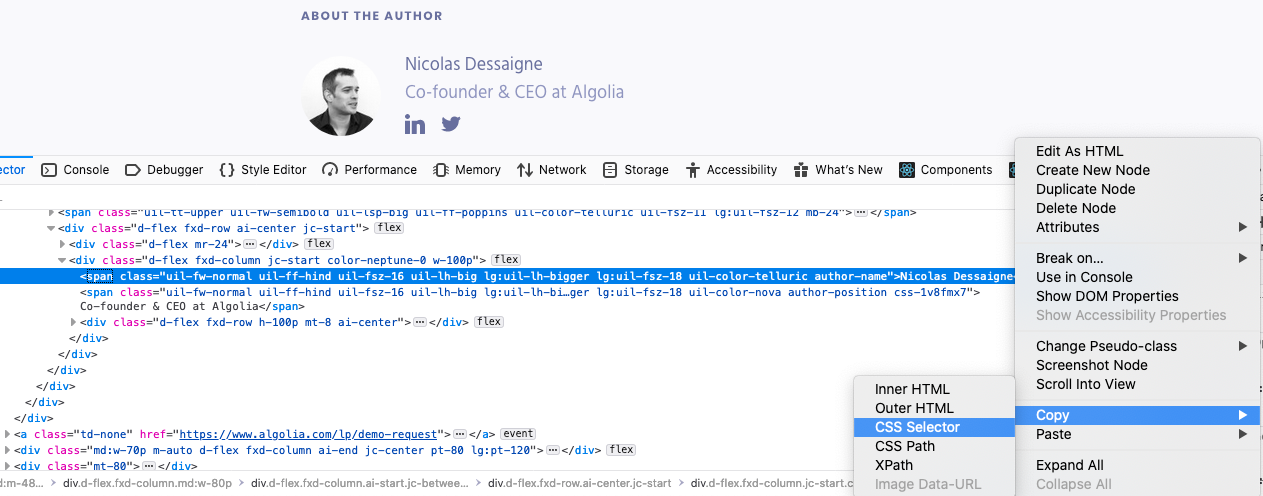
Depending on the browser, the generated selector might be complex and may be incompatible with Cheerio. In that case you have to manually craft it.
The selector also needs to be common to all the pages visited by this recordExtractor. Use the URL Tester to check the result.
With Firefox, you get the following selector: .author-name. You can test it in the URL Tester:
- Add the following field to the record returned by the
recordExtractormethod:Copy1
author: $(".author-name").text(),
- With the URL Tester, run a test for one of the blog articles (for example,
https://blog.algolia.com/algolia-series-c-2019-funding/).
In the logs, see the following generated record:
1
author: ""
This means the author field wasn’t retrieved accurately.
Debugging selectors#
Debugging the selector with the console#
You can use the console to debug a selector. The recordExtractor lets you use console.log, and displays the output in the Logs tab of the URL Tester.
1
console.log($(".author-name").text());
In your browser#
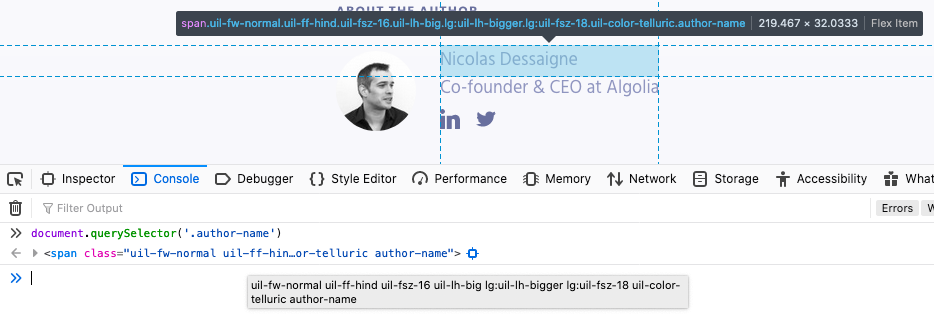
To understand why the Crawler can’t extract the information, use the browser’s developer tools. Open the API console:
- In Firefox: Tools > Web Developer > Web Console
- In Chrome: View > Developer > JavaScript Console
And test your selector using the DOM API:
You should retrieve the HTML element containing the author name.
What else is the Crawler missing?
Check for the need of JavaScript#
The difference between what you see in a browser and what the Crawler sees often comes from the fact that JavaScript isn’t enabled by default on the Crawler. JavaScript makes websites slower and consumes more resources, so it’s up to you to enable it on your crawler.
To display your page without JavaScript:
- In the browser console, click on the three dots on the right and select Settings
- Find the
Disable JavaScriptcheckbox and tick it.- If you’re using Chrome, reload the page.
Now look at the author section: the author name is missing.
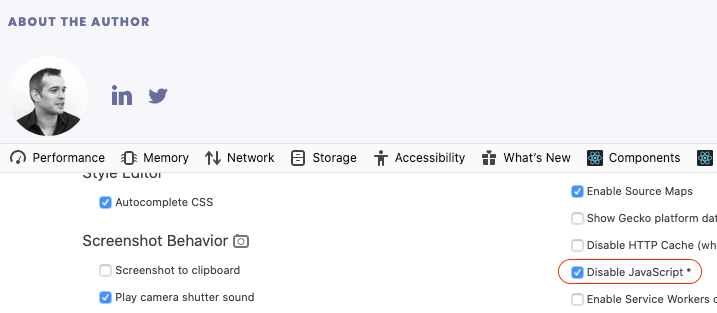
This is why the Crawler can’t extract it: your blog articles need JavaScript to display all the information.
To fix that, enable JavaScript in your crawler for all blog entries with the renderJavaScript option:
1
2
3
new Crawler({
+  renderJavaScript: ['https://blog.algolia.com/*'],
});
When running a new test on the same blog article, you can now see that the author field populates like it should.
There is often a better way to get that information without enabling JavaScript: meta tags.
Meta tags#
Websites often include useful information in their meta tags, so they can index well in search engines and social media. There are several types:
- Standard HTML meta tags.
- Open Graph, a protocol originally developed by Facebook to let people share web pages on social media. The information it exposes is clean and expected to be searchable. If the website you want to crawl has Open Graph tags, you should use them.
- Twitter Card Tags, which is like Open Graph but specific to Twitter.
Look at some other meta tags that the Algolia blog exposes. You can do this either on the Inspector tab of the developers tools, or by right-clicking anywhere on the page and selecting View Page Source.
1
2
3
4
<meta content="Algolia | Onward! Announcing Algolia's $110 Million in New Funding" property="og:title"/>
<meta content="Today, we announced our latest round of funding of $110 million with our lead investor Accel and new investor Salesforce Ventures along with many others. In" name="description"/>
<meta content="https://blog-api.algolia.com/wp-content/uploads/2019/10/09-2019_Serie-C-announcement-01-2.png" property="og:image"/>
<meta content="Nicolas Dessaigne" name="author"/>
This information is directly readable without JavaScript. You can see that the default configuration already includes some of them.
You can remove the renderJavaScript option and update your configuration to get the author using this tag:
1
$("meta[name=author]").attr("content"),
Remember that $ is a Cheerio instance that let you manipulate crawled data. You can find out more about their API.
Improved configuration# A
Your improved blog configuration now looks like the following:
1
2
3
4
5
6
7
8
9
10
11
12
13
14
15
16
17
18
19
20
21
22
23
24
25
26
27
28
29
30
31
32
33
34
35
36
new Crawler({
  appId: "YOUR_APP_ID",
  apiKey: "YOUR_API_KEY",
  indexPrefix: "crawler_",
  rateLimit: 8,
  sitemaps: ["https://blog.algolia.com/sitemap.xml"],
  ignoreQueryParams: ["utm_medium", "utm_source", "utm_campaign", "utm_term"],
  actions: [
    {
      indexName: "algolia_blog",
      pathsToMatch: ["https://blog.algolia.com/**"],
      recordExtractor: ({ url, $, contentLength, fileType }) => {
        return [
          {
            // The URL of the page
            url: url.href,

            // The metadata
            title: $('meta[property="og:title"]').attr("content"),
            author: $('meta[name="author"]').attr("content"),
            image: $('meta[property="og:image"]').attr("content"),
            keywords: $("meta[name=keywords]").attr("content"),
            description: $("meta[name=description]").attr("content"),
          }
        ];
      }
    }
  ],
  initialIndexSettings: {
    algolia_blog: {
      searchableAttributes: ["title", "author", "description"],
      customRanking: ["desc(date)"],
      attributesForFaceting: ["author"]
    }
  }
});
Next steps# A
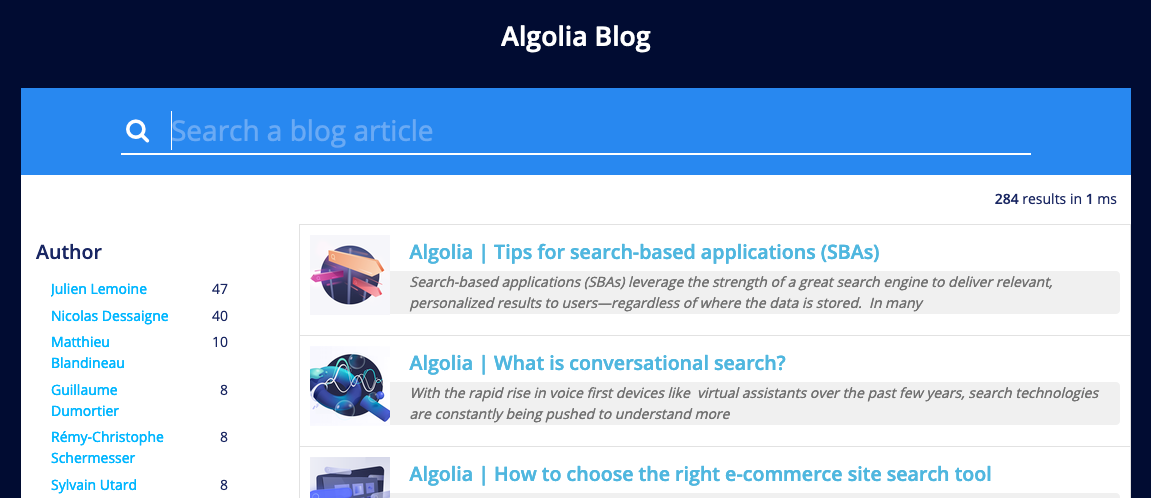
Having the author enables you to add faceting to your search implementation.
Interesting next steps would be:
- Indexing the article content to improve the discoverability.
- Indexing data that lets you add custom Ranking, such as the publish date of the article, or Google Analytics data to boost the most popular articles.
- Indexing more information about the author, such as their picture and job title.
- Set up a
scheduleto have the blog crawled on a regular basis.
Configurations examples# A
If you want to get a better sense of how to use and format crawler configurations, check out your GitHub repository of sample configuration files.
